THE WILD BUNCH:
|
Introduction |
Page 3 |
|
PASSES: 100 SEAM |
Page 7 |
|
101 CROSS |
Page 11 |
|
202 SMASH |
Page 16 |
|
112 DIVIDE |
Page 20 |
|
113 GO |
Page 21 |
|
124 MESH |
Page 26 |
|
(124 OPTION SCREEN) |
Page 31 |
|
225 TRIANGLE |
Page 32 |
|
126 SWITCH |
Page 37 |
|
117 SLIDE |
Page 42 |
|
118 SHORT |
Page 47 |
|
129 TURN |
Page 51 |
|
333 BOOT |
Page 54 |
|
335 OVER |
Page 55 |
|
RUNS: 21 SWEEP |
Page 58 |
|
33 DIVE |
Page 63 |
|
34 COUNTER |
Page 68 |
|
35 TRAP |
Page 73 |
|
36 ZONE |
Page 78 |
|
37 DIVE |
Page 82 |
|
38 DRAW |
Page 87 |
|
49 SWEEP |
Page 88 |
|
Supplement/Specials |
Page 92 |
|
Pass Protection |
Page 119 |
|
Running Wild |
Page 121 |
NUMBERING SYSTEM:
TWO DIGITS = RUNS: Back (H=2, FB=3, Z=4) and hole (see Pages 3 and 4).
THREE DIGITS = PASSES:
First digit is QB drop and protection - 100
is 3-5 step cup, 200 is half-roll, 300 is play action.* (See Page
119 for Pass Protection rules.)
Second digit is motion: 2 sends H to Bunch,
1 sends Z to Spread, 0 = No Motion.
Third digit is route package: 0 = Seam,
through 9 = Turn.
*Note: In play action (300), second and third digits are the running play being faked.
I am a big fan of the Mouse Davis Run and Shoot offense, and have been ever since I was an undergrad at Berkeley around 1980. Like many others, I had heard of the unbelievable scores Davis's offense had posted at Portland State since 1975. Davis was brought in for a one-year stint at Cal as Offensive Coordinator under Head Coach Roger Theder while I was a student there. I still remember sitting in the stands at Memorial Stadium during open practices that summer, when Davis would run the offense through his revolutionary package, and I would furiously scribble notes and diagrams. A running back I shared a class with explained to me the Davis theory of reactive offense: classifying defensive secondaries as Three-Deep, Two-Deep, Man or Blitz, then adjusting routes based on defensive reactions. Those reactions were highlighted by the use of long motion across the formation on almost every play.
My love affair with the Run and Shoot culminated in a head coaching job in Melbourne, Australia from 1988-90, where I installed the R&S and took a last-place team into the semi-finals. The second year, two teams ran the R&S, and the other one won the championship (the Division III studs they imported from Ohio didn't hurt, either).
All during the 80's, though, I was torn between the demonstrated power and simplicity of the R&S, on the one hand, and the fascinating experiments that Joe Gibbs, Bill Walsh and others were performing with compressed formations, on the other. I tried time and again to apply the bunched receiver principle to the R&S, but without success. Finally, while working in the U.S. in the summer of 1995, I had the opportunity to coach an entry in a high school 7-man passing league. The head coach and offensive coordinator (both die-hard Power-I types) weren't around that summer, so I interpreted the HC's instructions in May to "have some fun" fairly broadly: I installed the original version of the Wild Bunch (I think I called it something really lame like the "Cluster Bomb").
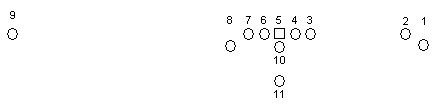
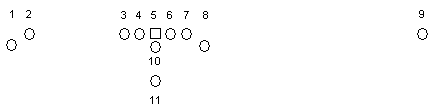
Key to Page 4 Illustrations
| 1: Z back | 4: Bunch Guard | 7: Spread Tackle | 10: Quarterback |
| 2: Y end | 5: Center | 8: H back | 11: Fullback |
| 3: Bunch Tackle | 6: Spread Guard | 9: X end |
(Note: Numbers 1-9 in Right and Left below are also our hole numbers for runs.)
Right
Left
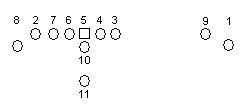
Swap Right
Swap Left
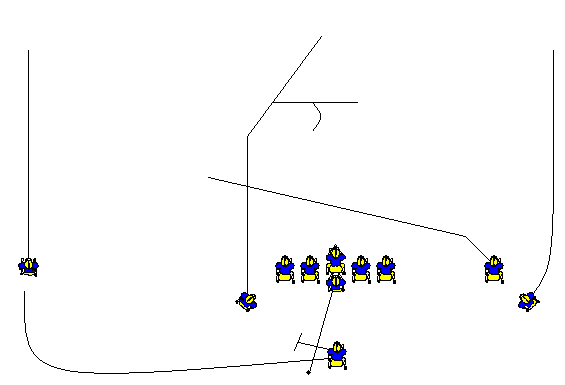
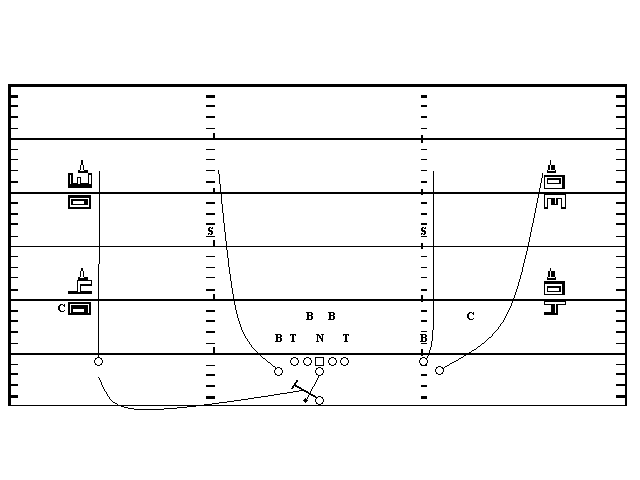
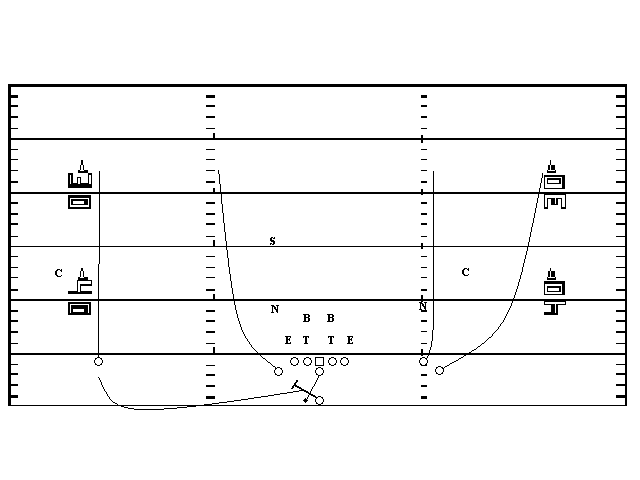
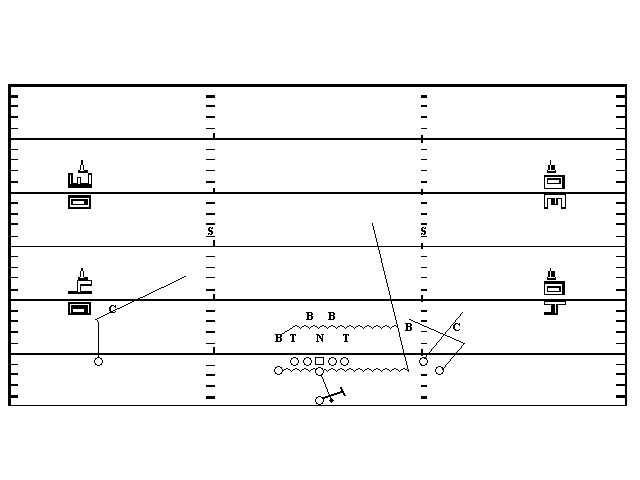
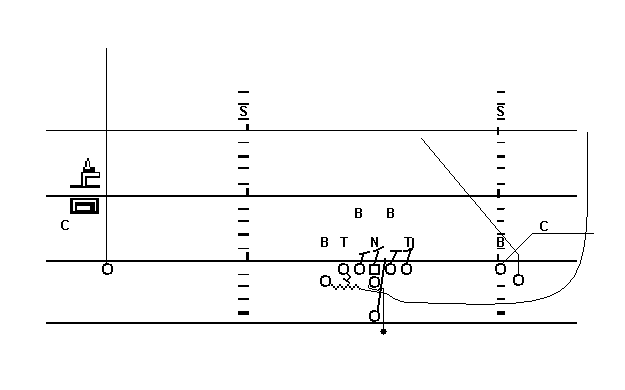
(See page 5.) The X end (17 yards from his tackle, but no closer than 6 to the sideline) and H back (1 yard from the same tackle, 1 yard back) made up the Spread side, while the Y end (6 yards from the other tackle) and Z back (1 yard further out, 1 yard back) formed the Bunch side. The FB's heels were 5 yards from the LOS, directly behind the QB. The (theoretical) line used one-foot splits. We sent H in motion across the formation to form the Bunch, or Z in the other direction to form R&S Trips. To the R&S Seam, Go, Slide and Smash patterns, I added a bunched Slant and Fade. Using those six patterns and a Draw off of Go action, we tore a hole through the competition. Like Lucy Ricardo, though, I had "a lotta 'splainin' to do" when the coaches got their team back that August...
In 1997, Andrew Coverdale and Dan Robinson's outstanding The Bunch Attack: Using Compressed Formations in the Passing Game (Coaches Choice Books: Champaign, IL, 1997) codified and greatly added to the bits and pieces of Bunch offense I had picked up along the way. The Wild Bunch emerged in a recognizable form that year: the passing game consisted of Seam, Cross, Smash, Go, Mesh, Triangle, Switch, Slide and Over route packages. The running game was a combination of R&S (Trap and Draw) and modern one-back (Inside Zone and Counter Gap). I have since added the Fly Sweep series (Sweep, Dive and Bootleg) to provide a sequenced run-pass threat, and to get H or Z out wide with the ball while using the same motion that creates the Bunch or R&S Trips. See page 116 for a discussion of the Short and Turn packages.
Where the tendencies of R&S and Bunch have conflicted, I have gone with simplicity. There is only one formation, for example, not including the Swap and Snug adjustments to blitz situations (Pages 4 and 96 -- and see discussion of zone blitz on Page 124). This saves an unbelievable amount of practice time, and allows the offensive to get more practice reps of the 18-20 core plays we normally carry. Since we flip-flop the offense, players get used to running plays, both right and left, from the same position relative to their teammates. (With the defense spread across the field, and motion across the formation used on almost every down, the Davis R&S has utilized "only" one formation, yet has managed to avoid stereotyping for the last quarter century -- so I'm not too worried about its stepchild, the Wild Bunch.)
See page 104 on why the option isn't an integral part of the Wild Bunch.
If you're looking for a way to "air it out", look no further. The Wild Bunch offers the best of two highly-evolved passing attacks -- the R&S provides an unparalleled method for stretching the defense and reading its adjustments to long motion, while the Bunch Attack offers some of the most cunning route packages ever designed. In fact, with both arsenals and the Fly Sweep sequence to choose from, offensive football becomes downright fun, especially in the Red Zone. There is no way for the defense to overload against one receiver or one route package without instantly and obviously exposing a weakness elsewhere. As for the running game, I leave the last word to Mouse Davis: "The only way to keep us from running is to let us pass."
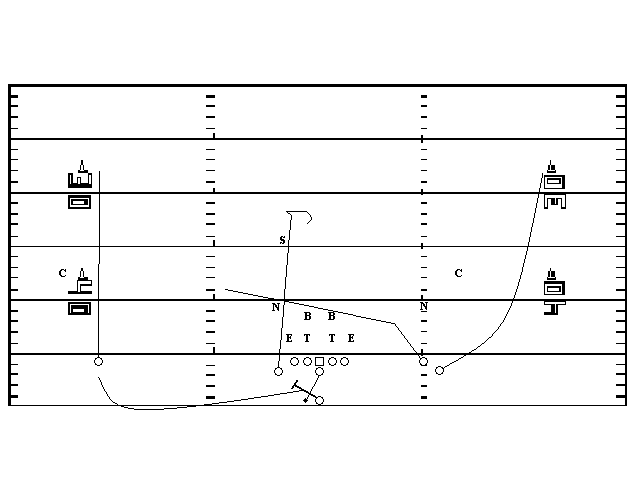
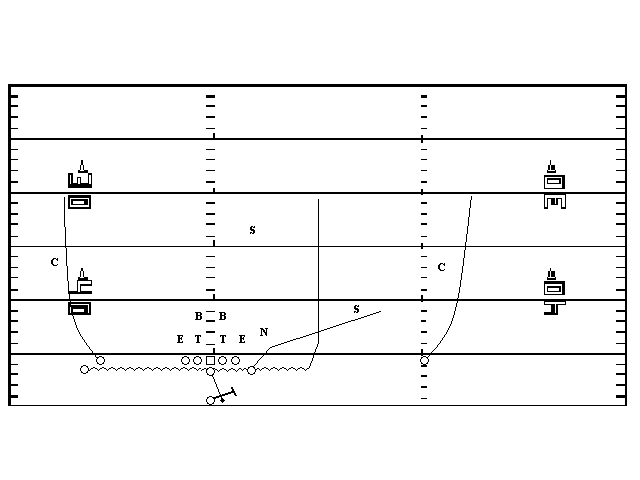
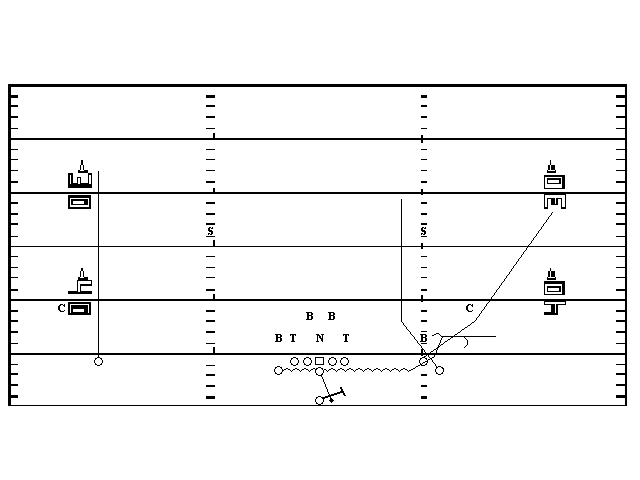
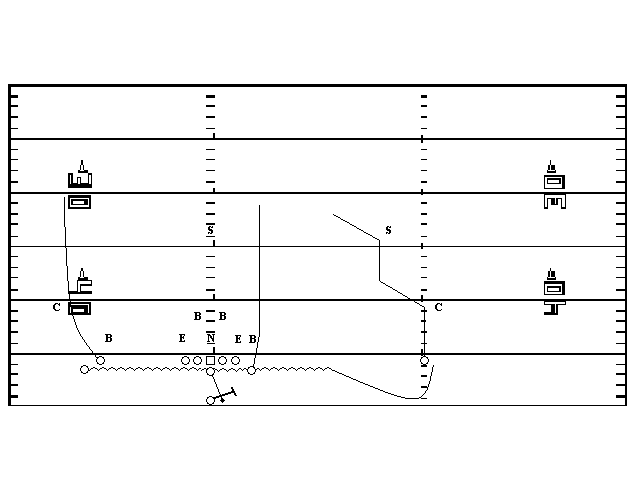
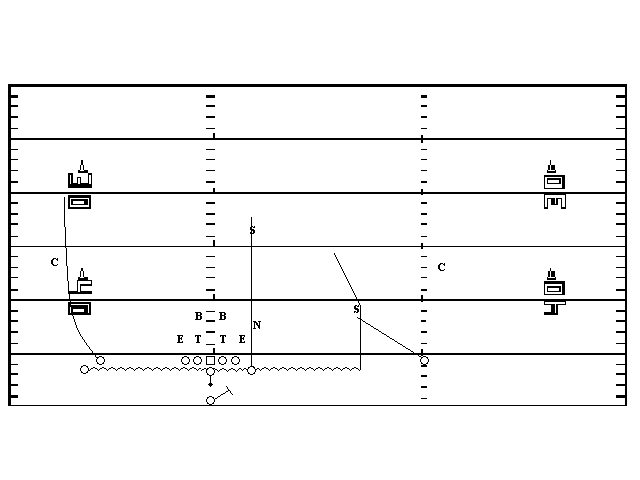
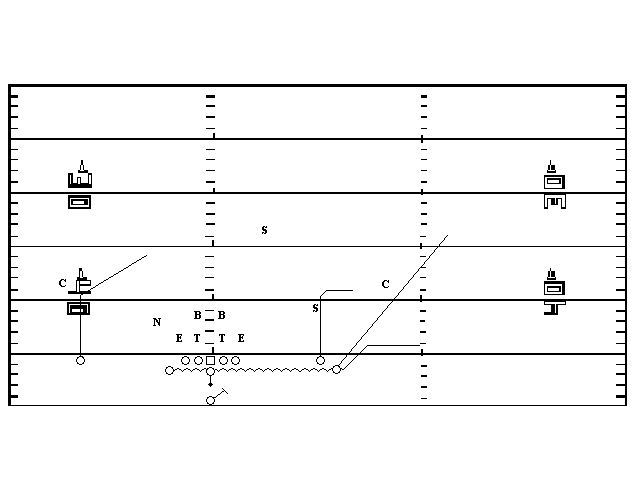
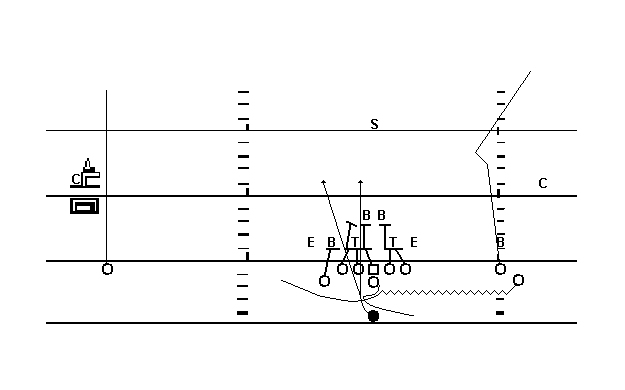
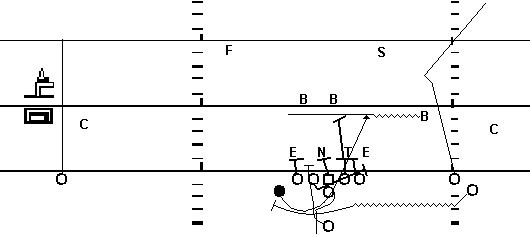
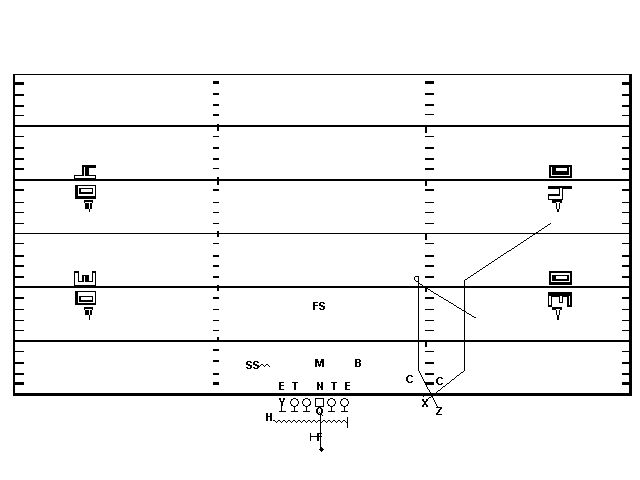
100 SEAM
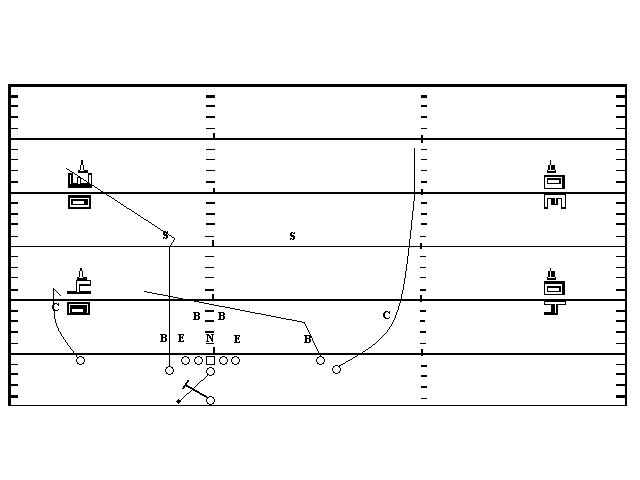
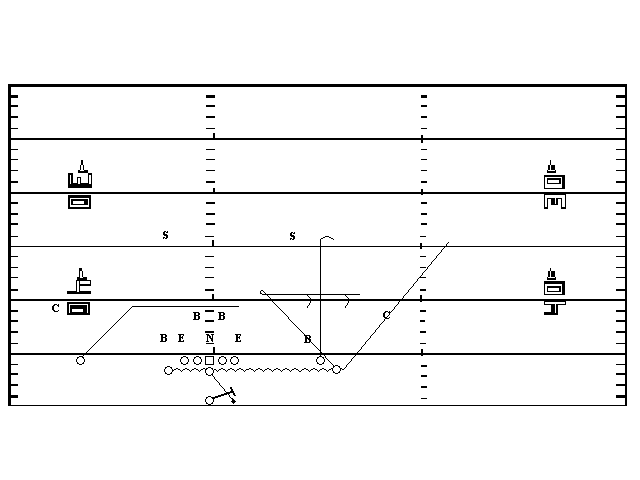
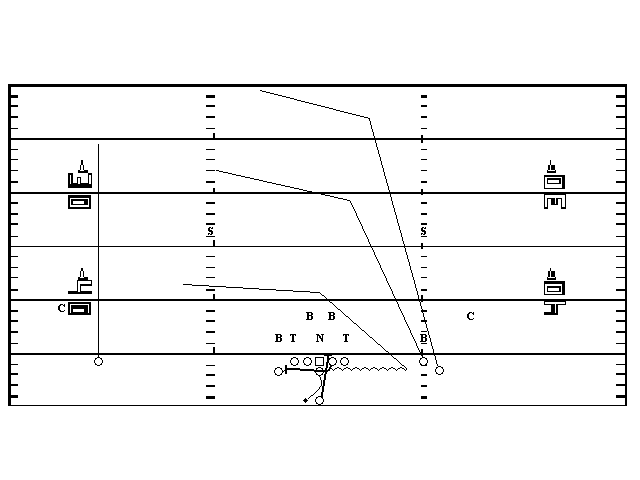
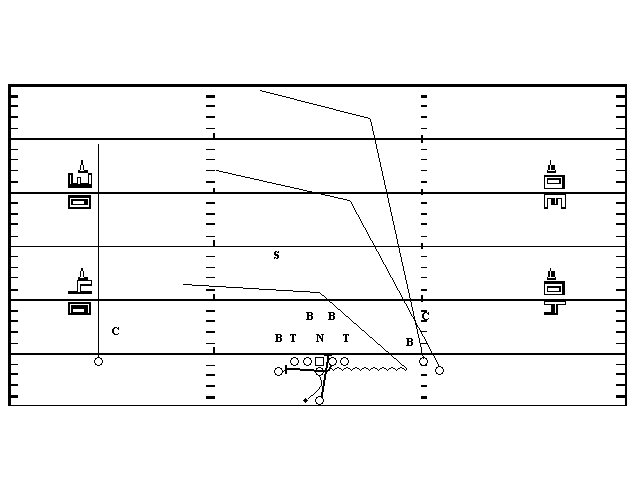
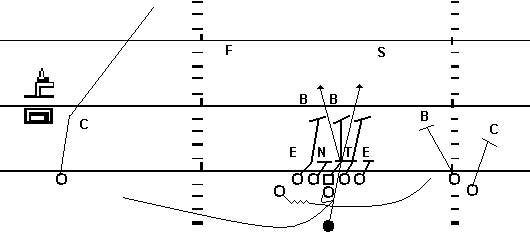
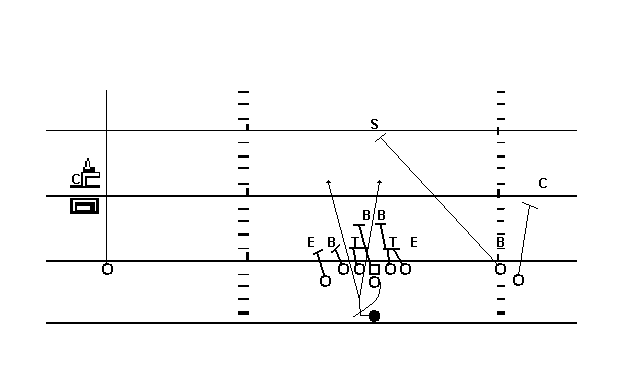
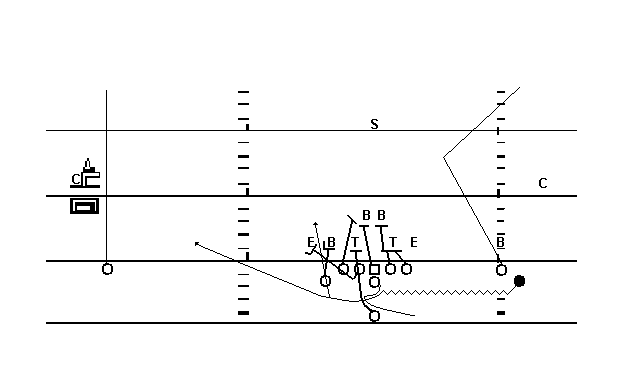
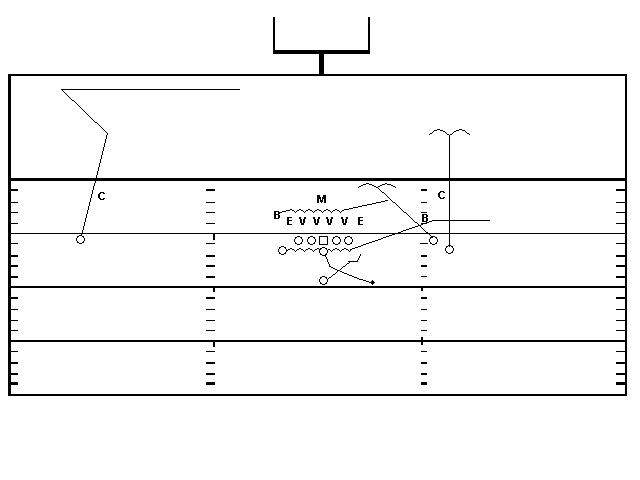
This "four verticals" play makes concrete the implicit threat of the Wild Bunch -- cover our four immediate receivers, or pay the price. X and Z run the numbers, while H and Y zip down the hashes, looking for the ball quickly. While H is the most likely recipient of a quick dump pass, any of the four receivers running their landmarks or the Fullback running his Check Flare can get the ball right now. Against Cover 1 or 0, Y breaks opposite his man (usually to the outside), flattens out at +6, and becomes the primary receiver. Any team facing Cover 3 must include this play in their arsenal.
QB should look at one receiver as he drops -- if the safety reacts, hit the other hash runner -- if not, throw the ball to the receiver you've been looking at.
Sometimes the safety tries to "split the difference" and drops right down the middle of the field, trying to tempt the QB into indecision and a late, panicky throw which will be much easier to deflect or pick off. If, as you drop, with your peripheral vision you see the safety playing "dead center field," throw the ball to the receiver you're looking at RIGHT NOW -- the shorter the throw, the less time the safety will have to react.
Of course, if the safety DOESN'T widen, we'll just keep hitting the Smash...
COVER 4: Your best chance for a mismatch is between H and the free safety that commits to the vertical route; next choice is FB running his check Flare, especially if the flat defender doesn't get width fast enough.
COVER 1/0: Against Man or Blitz looks, we cut Y's route short -- he breaks opposite his defender (almost always to the outside) at +6. Against C0, QB looks for him quickly, anticipating the blitz. He has the choice of standing in and waiting for Y, or scrambling away from the pressure to Spread. When our receivers see him scramble, they are free to break for the sideline or downfield (see page 15). Against C1, we look for a speed mismatch, usually between H and the man covering him.
It only takes one slip or hesitation to score with this route package, so we like to call it fairly frequently in the first quarter to see what the defense is made of, and again near the end of the game to see who's in better shape.
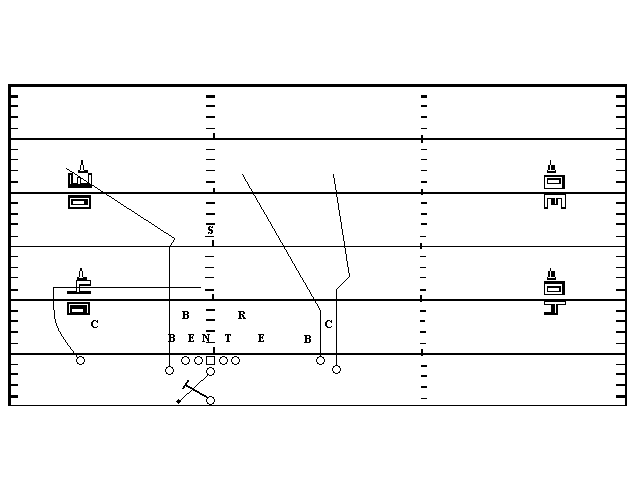
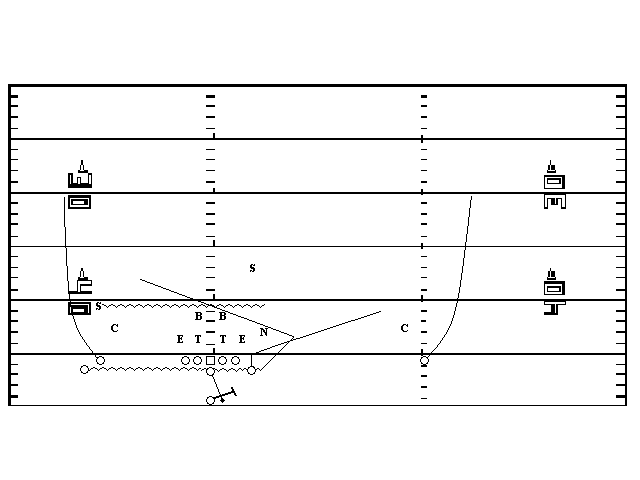
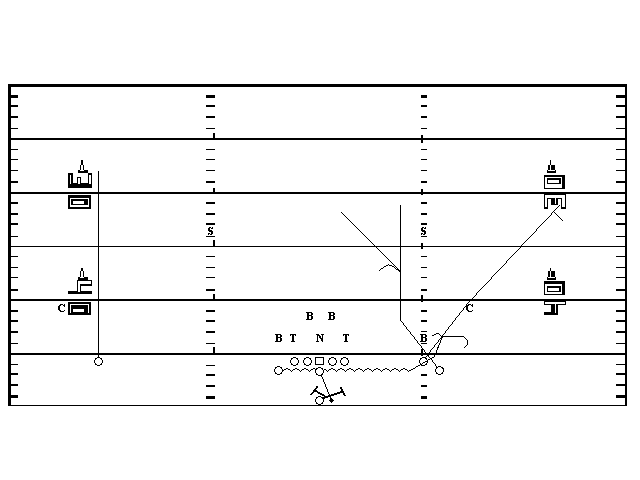
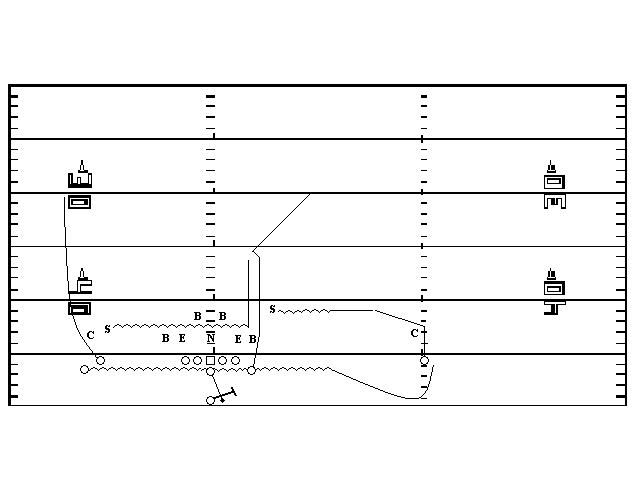
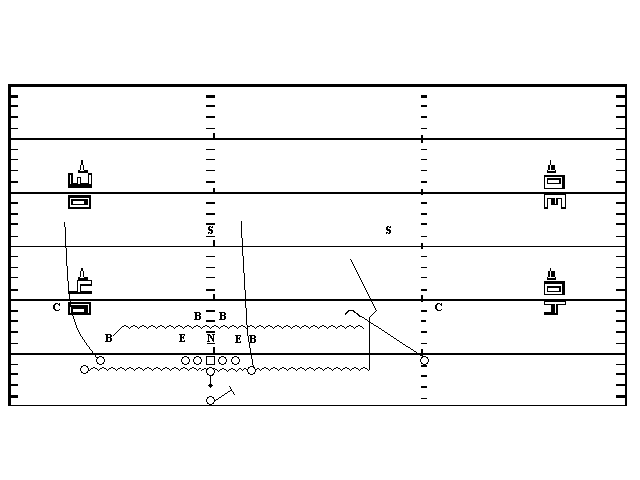
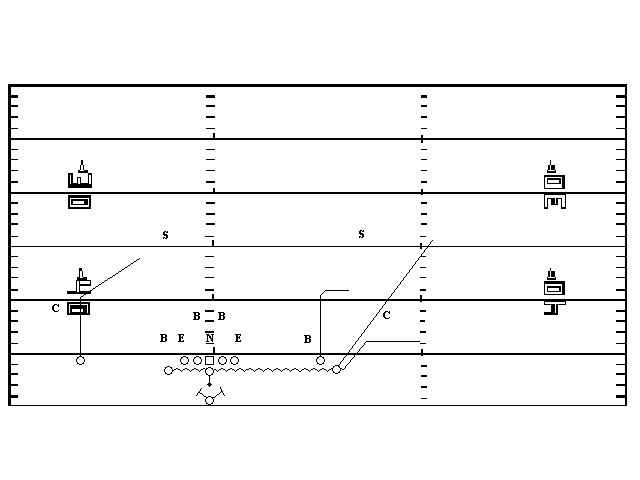
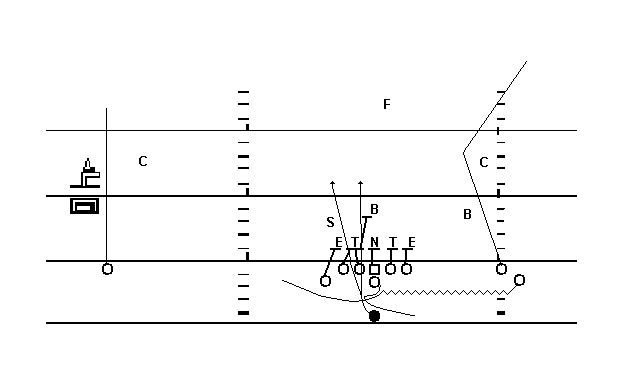
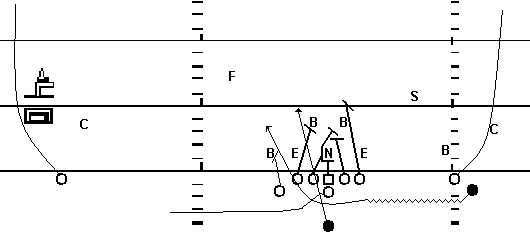
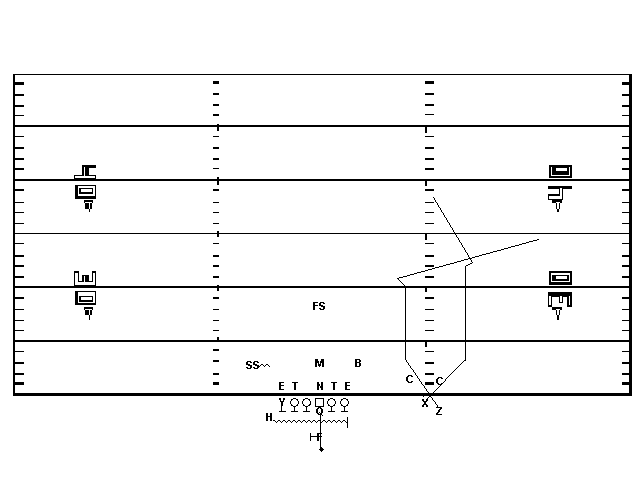
101 CROSS
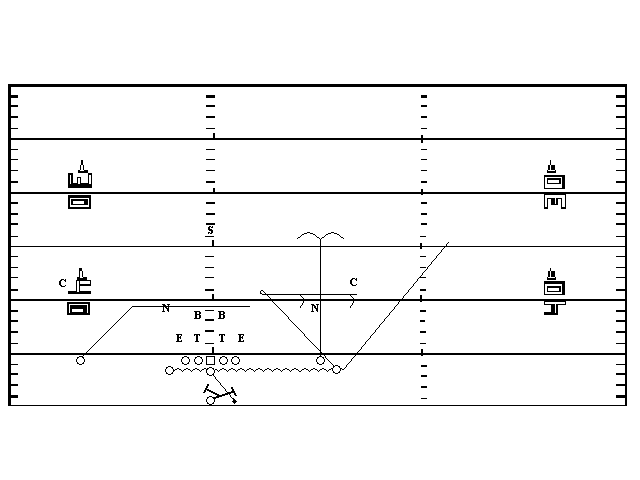
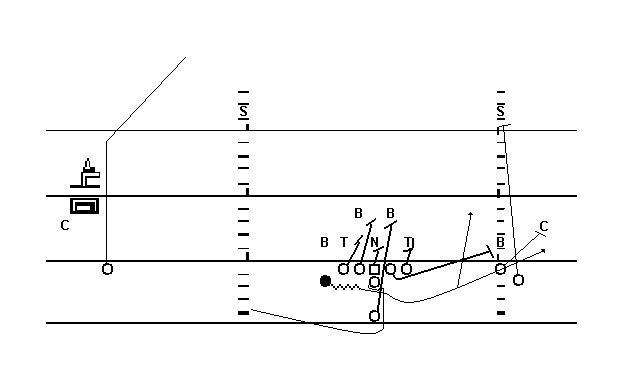
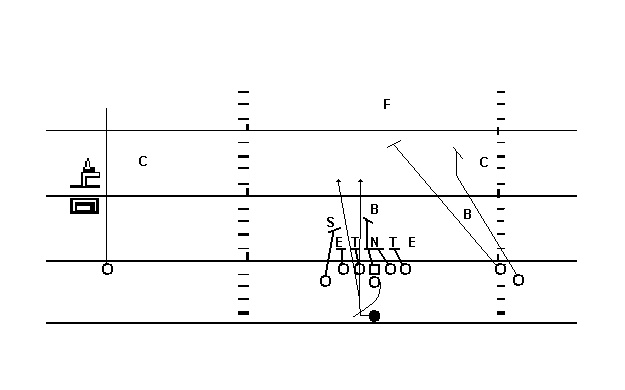
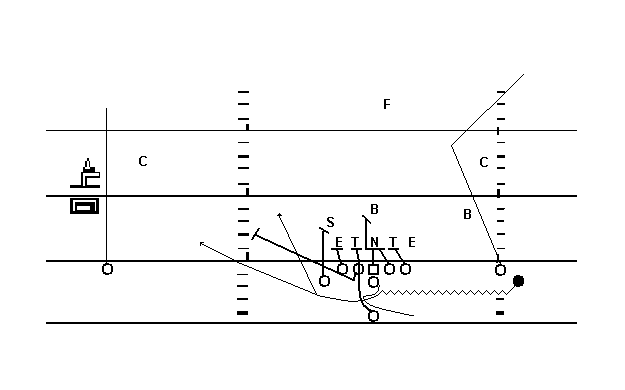
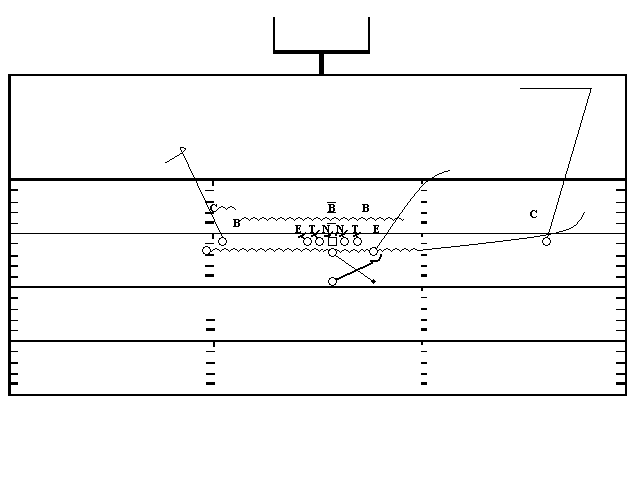
The fun begins. Y Crosses to +6, while H runs a Middle Read, releasing slightly inside. If there is no middle safety, he breaks deep down the hole. (If there is a C2 safety ahead of him, H freezes him with eye contact and breaks inside.) If there is someone playing deep middle, H plants his outside foot at +12 and breaks hard to the inside -- accelerating away from man coverage or finding the zone window. If zone, he makes eye contact with the QB and shuffles straight back down the window toward him. The QB quickly looks off backside coverage, then reads the first two short defenders inside the PCB. H's Middle Read beats the first short defender inside (he must respect FB's Flare, so can't jam down inside). Y's Cross now challenges the second short defender: if he follows the Cross, a lane opens wide for the Middle Read; if he sits or drops vertically, the Cross comes open, and Y cuts downfield after the catch.
Although Coverdale and Robinson diagram a whole range of crossing variations off the four-verticals package, we have chosen the single Cross/Middle Read combination as the best weapon to use in our small but effective arsenal.
COVER 3: The fun takes place underneath (assuming the corners can keep up with X and Z). H drives the safety off, then cuts his Middle Read into a deep curl, sitting down in the hole between the safety and ILB's. FB's Check Flare will keep the underneath defender just outside the playside ILB occupied, so he can't help inside. The playside ILB is now impaled on the horns of a wicked dilemma: if he widens with the Shallow Cross, he leaves the QB a perfect view of H sitting in the zone hole; while if he sits or drops vertically, he gives Y the width he needs to catch the ball and turn downfield.
COVER 2: This is the coverage this play was designed to defeat. H's Middle Read turns into a deep shot down the middle of the field. If either safety plays too far inside, the numbers receiver outside him will get the ball deep. Again, the underneath coverage is in a bind between the Shallow Cross, Middle Read and Check Flare.
COVER 4: QB should look for H to break his Middle Read to the Post. If the short middle defender doesn't mug Y, look for him on the Shallow Cross. Finally, FB's check Flare can get outside if the Spread-side flat defender doesn't fight for width.
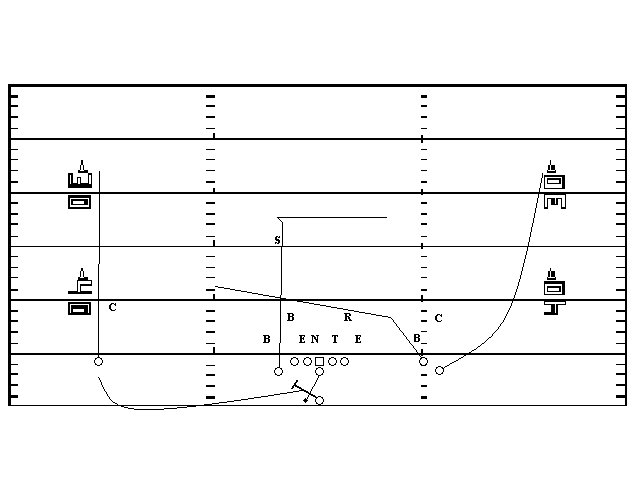
COVER 1: With man coverage underneath, Y's Shallow Cross turns into a footrace as the other receivers clear out deep for him. H cuts his route in front of the free safety, then accelerates away from his man.

COVER 0: Here the emphasis is on speed in anticipation of the blitz. H against his linebacker/DB is a likely mismatch, and he can clear coverage quickly. If you have time, look for Y breaking across. As with our R&S routes, if we feel 7 rushers coming, the line will call "Down" (see page 125), FB will take the frontside (Spread side) rusher, while the line will block the next five gaps toward Bunch, letting the backside rusher come free -- QB knows he is probably rolling to Spread when he hears the line call, and his receivers are free to cut the same way the QB is running (our scramble rule, which we practice every day) or signal a deep route by throwing a hand up as they break downfield.
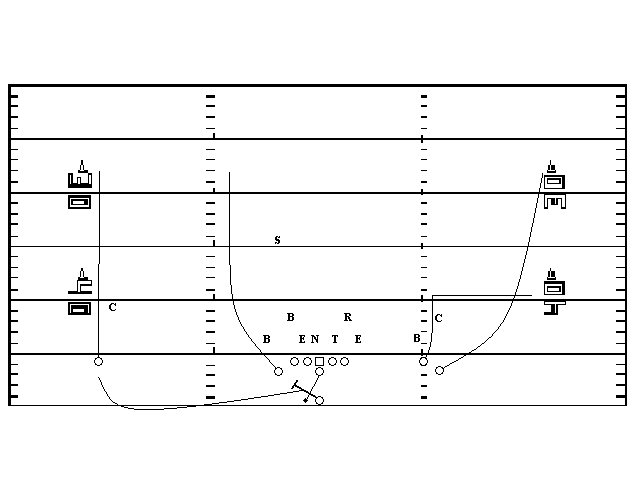
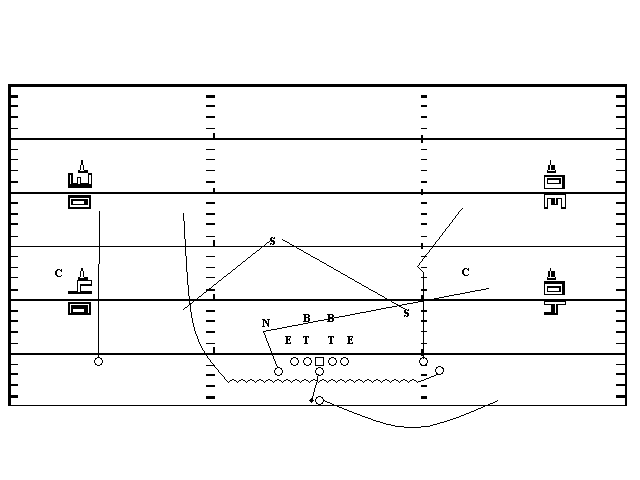
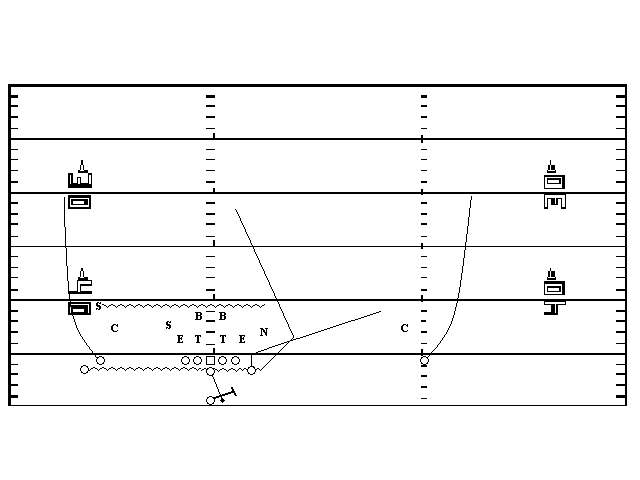
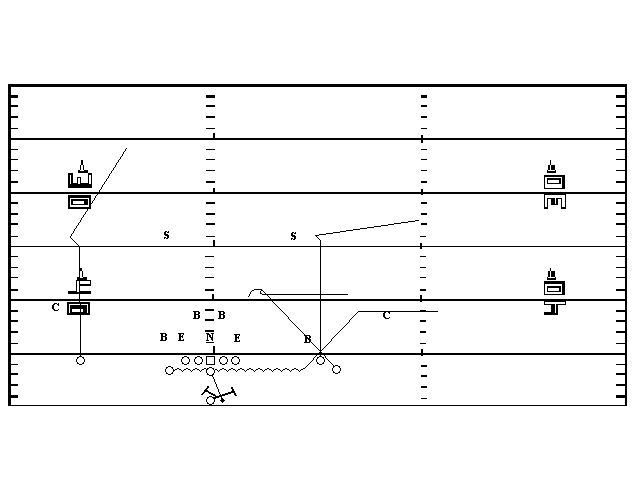
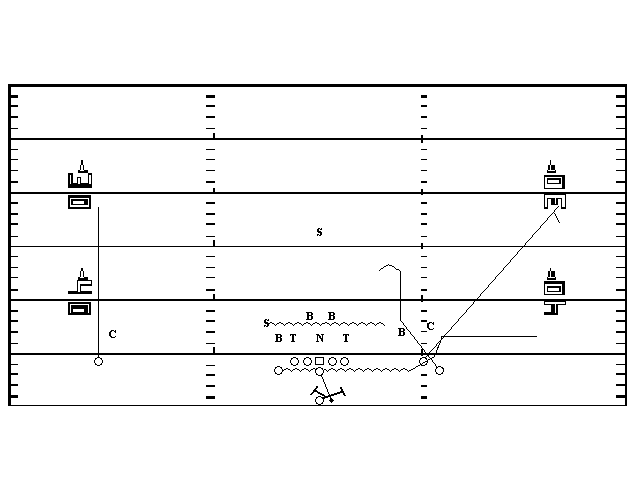
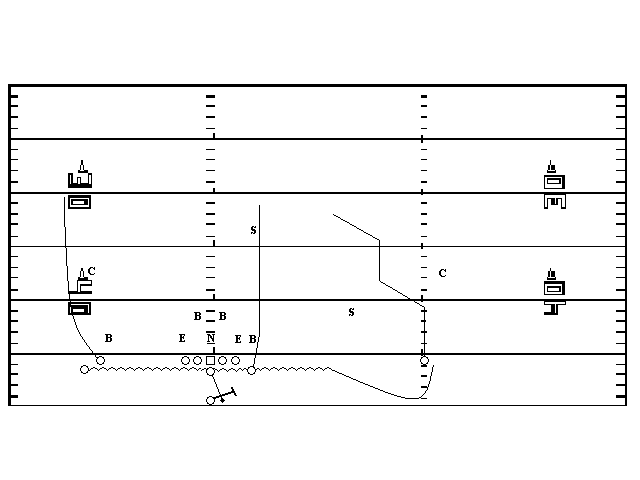
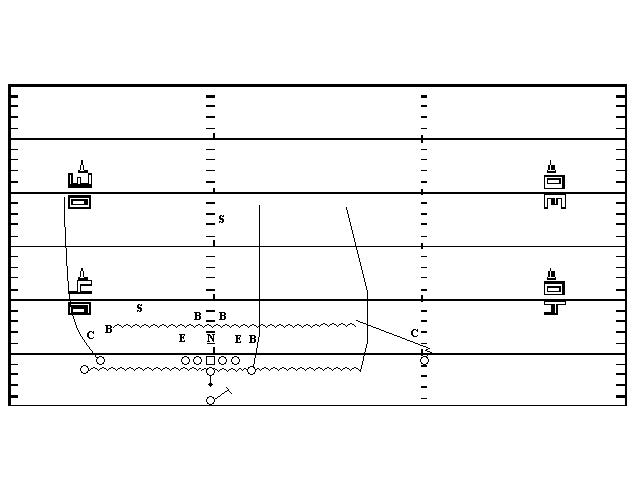
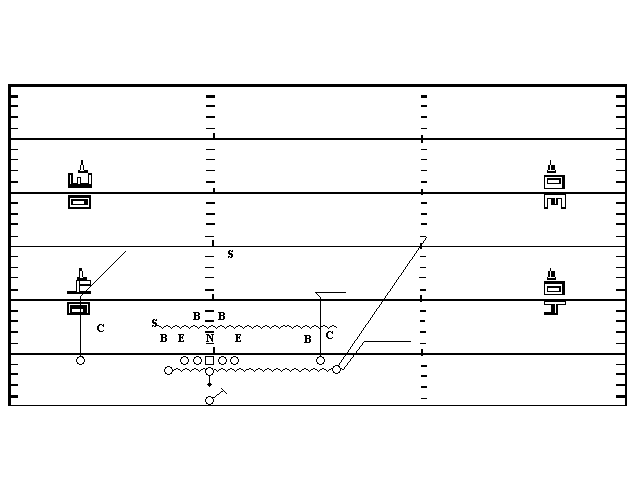
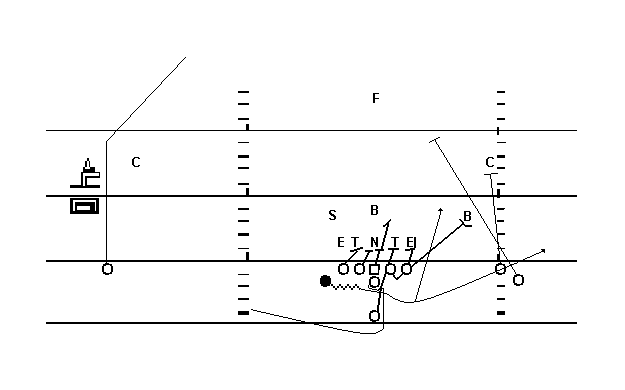
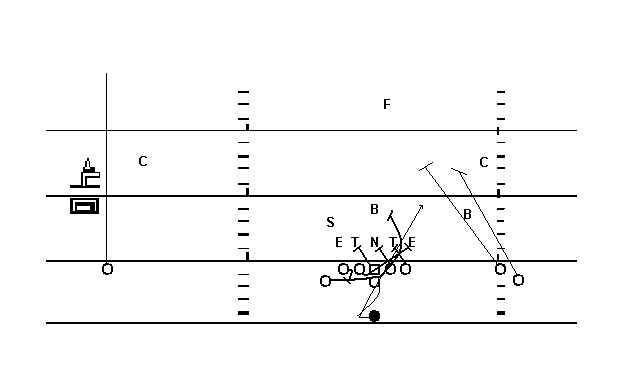
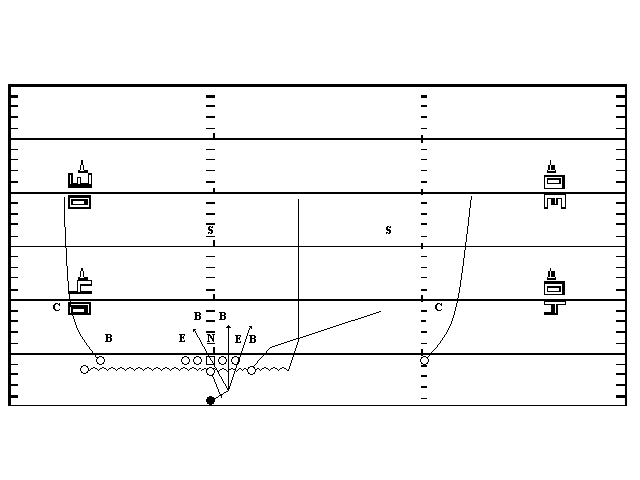
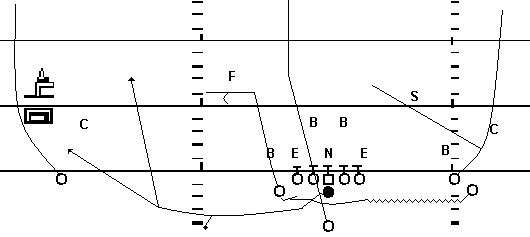
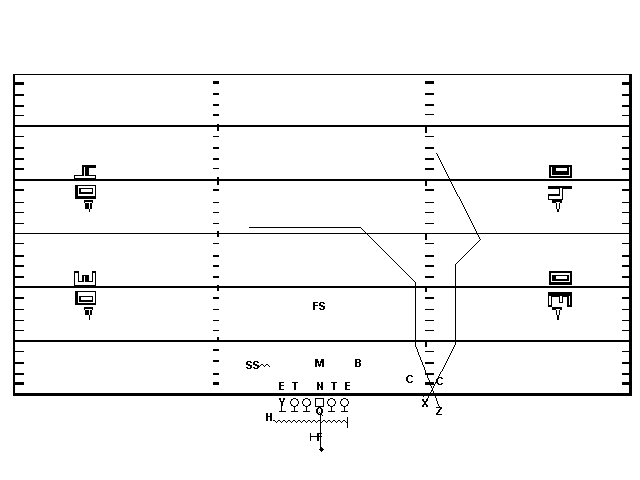
202 SMASH
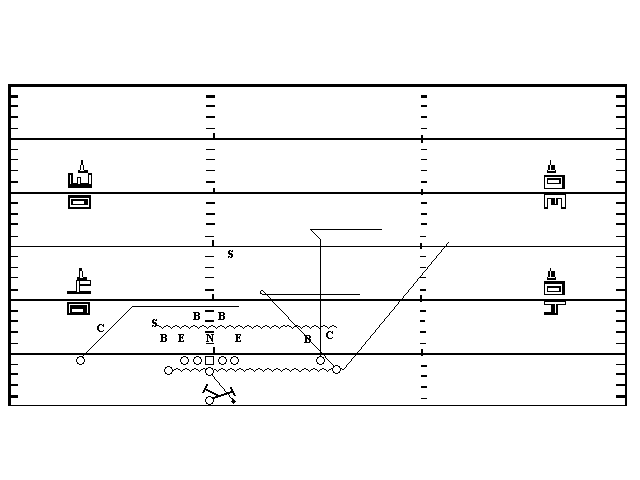
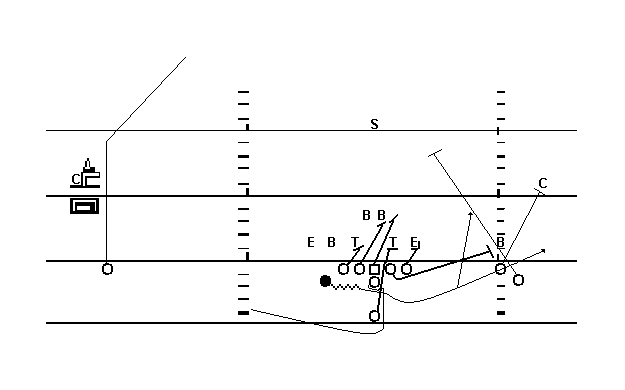
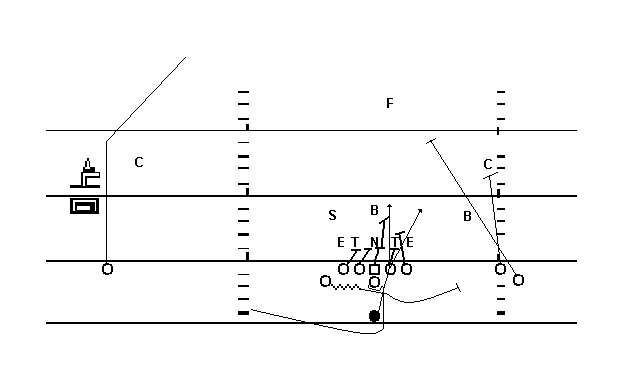
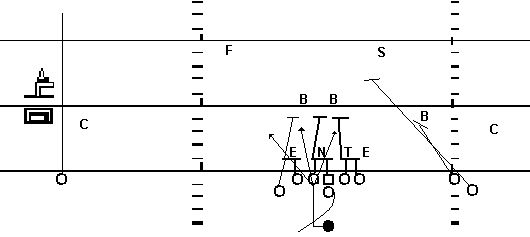
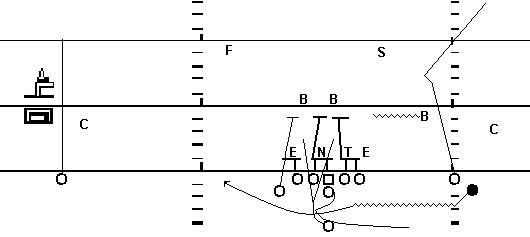
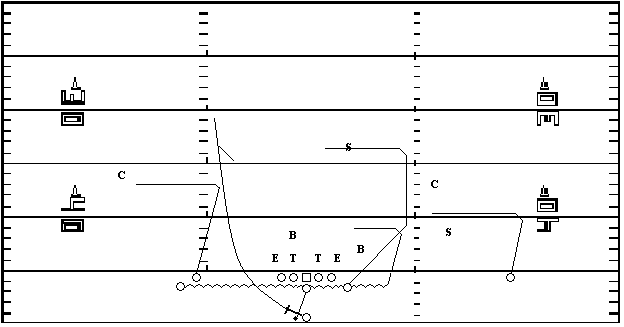
Even more effective than its R&S counterpart, since many defenses can't wait to overload to Bunch, often anticipating H's motion to wideside. Instead, without motion, QB half-rolls short at the snap, X hooks or breaks in at +6, H runs the Smash (post-corner) cut, while Y and Z run Cross, Seam or Post patterns, depending on coverage:
C3/2: X Hook, H Smash, Y Cross, Z Seam;
C1/0: X In, H Smash, Y Post, Z Post.
Late in the game, we have found Z open with no one within 20 yards of him -- tired defenders are sloppy defenders, aand we run these guys all over the field, all day long.

COVER 3: QB looks first to H. If he is not covered right off the line, hit him right now with a dump pass. Otherwise, set up behind Spread Tackle on the fifth step while reading the safety: if he flows playside or jump's Y's Shallow Cross, look for Z's quick Post.
COVER 2: X's hook at +6 pins the C2 corner short and wide; meanwhile H's Smash cut looks to split the difference between that corner and the playside hash safety. A defense that slides coverage toward the field and the Bunch will have a hard time defending this.
COVER 1/0/C2 MAN: While everyone else clears out deep, X turns his hook at +6 into a square in. We can block four frontside rushers and gain an extra second or two by half-rolling away from backside pressure. This is also good against C2/Man under, where you have three Posts operating deep against the two safeties, while X has plenty of room to work with short.
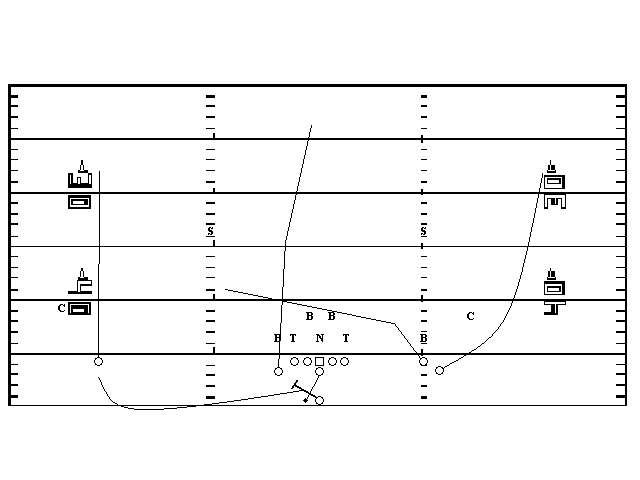
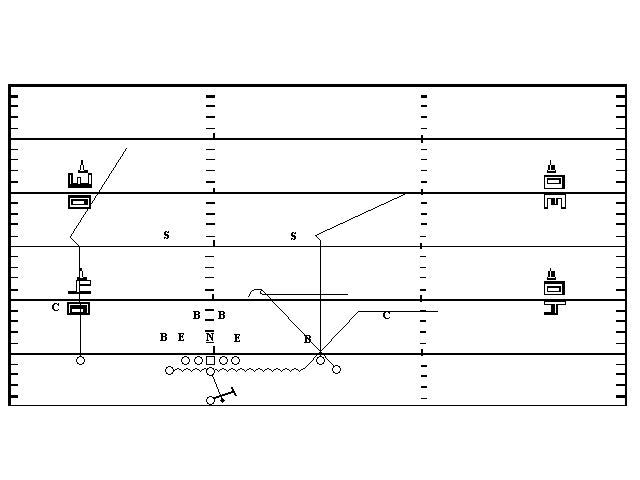
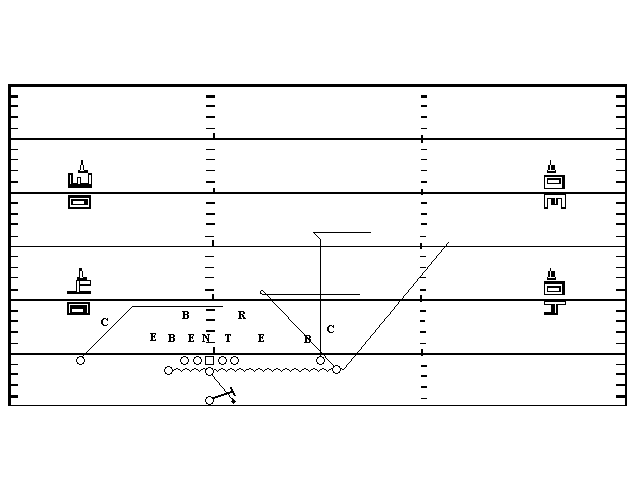
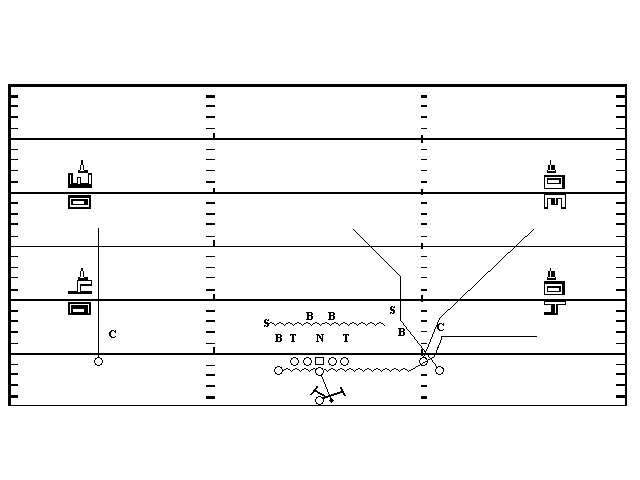
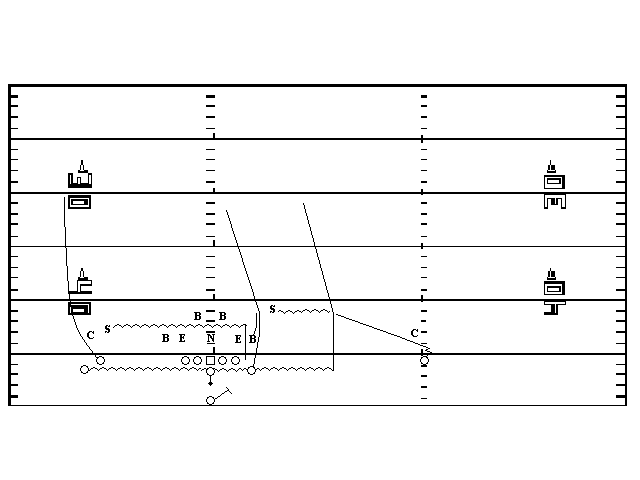
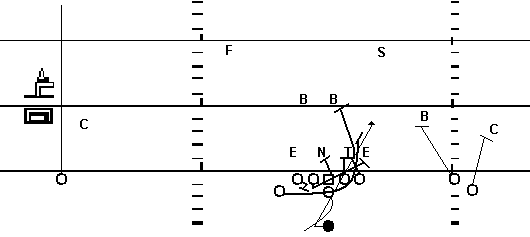
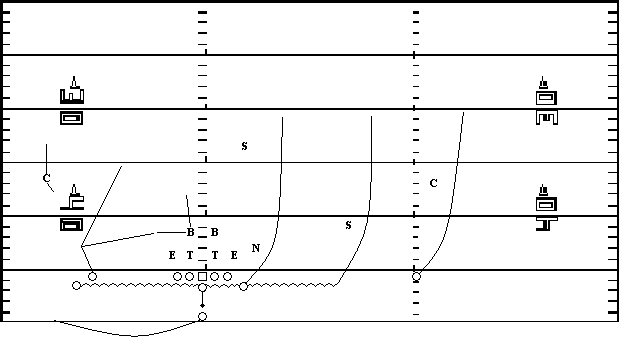
112 DIVIDE
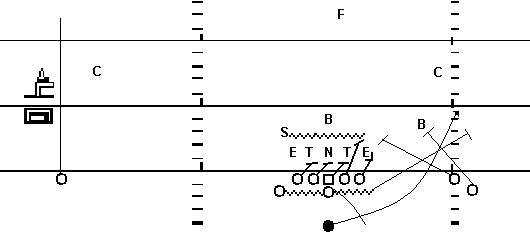
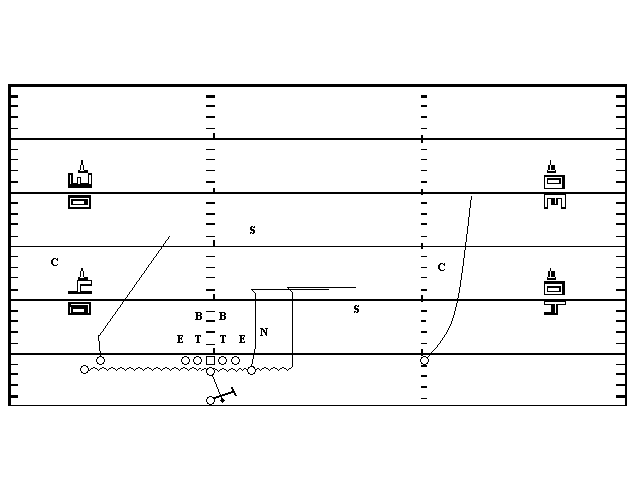
From the Wild Bunch, we instead send X and Z deep to influence the defense, while QB drops facing the Spread side. H starts outside, looking to turn a man defender's hips outside, or to "sell" his outside vertical route to a zone safety reading his pattern. He then cuts back hard across the formation, shooting for a depth of about +6 by the time he reaches Z's original position. Y runs the same Smash cut he does in Mesh, looking to split zone secondary defenders or gain separation against a man defender. FB Flares to the Bunch side, looking for the ball quickly -- he is the Q receiver if the QB feels pressure. Against zone defenses, QB should read the Bunch-side corner high-low, throwing to H or Y. FB becomes a reaction throw if the others are covered. Against C0 (blitz) coverage, QB looks FB/H/Y for the first open man. Once defenses start staying home when we motion Z, the R&S Trips routes (113/114/115/117/118) really open up.
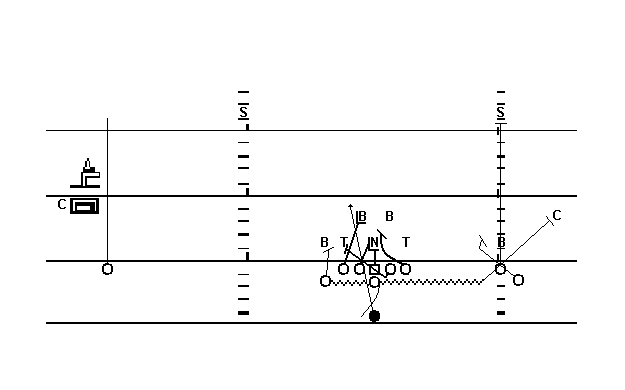
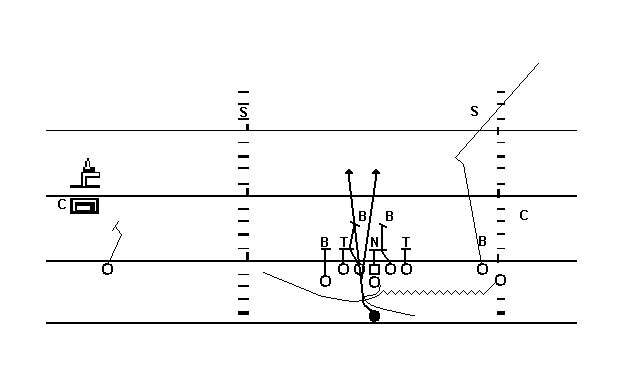
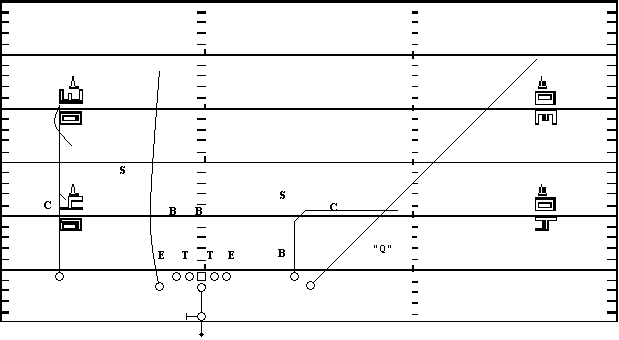
113 GO
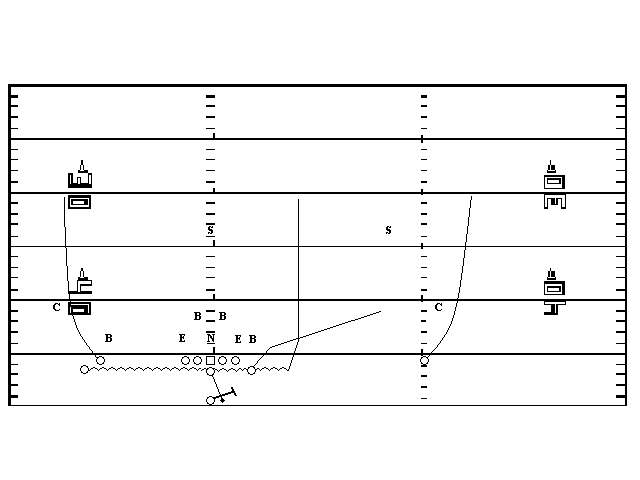
A classic "keep 'em guessing" R&S route package. We set the Spread to wideside, then motion Z to Trips. QB looks for H's Shoot on his third step, then either throws or pump fakes to signal the next phase of patterns, and scans deep frontside to backside as he rolls to Spread. X and Y run Seams against all coverages:
C3: Z is 5 yards outside H at snap, runs Seam. H Shoots - releases outside two steps, then heads for a spot on the sideline at +12.
C2: H Shoots, but breaks deep if QB pumps. Z starts 3 yards outside H, starts Seam, breaks to Post at +7, splitting safeties.
C1: H breaks straight downfield two steps, then Shoots. Z is one step outside H at snap, slants outside two steps, "selling" the deep cut, then runs Shallow Cross under safety.
C0: Same as C1, but with no deep safety, Z turns his pattern into a quick Post after the outside cut.
COVER 3: The idea here is to make the Strong Safety wrong no matter what he does. Z gains depth and H width, forcing the SS to commit. If the FS comes over across the top of Z, he will hook up at about +14 and come back toward the QB in the zone window. If H sees a pump-fake after he makes his cut outside, he will turn downfield and look for the ball over his inside shoulder (at the far hash in the diagram, or at the far numbers if the ball is snapped between the hashes).
COVER 2: Defenders will have a hard time covering this package whether it's run from the hash as diagramed, or from mid-field. From the hash, this is a familiar attack on the C2 safeties -- X and Y run Outside Verticals, while Z's route strikes right down the middle. Meanwhile, the under-coverage had better account for H's Shoot route, or we end up with one of the best ball-control passing plays in football. If the PCB gains depth with X, H will come wide open. If not, pick a safety and bracket him, just like Seam. Run from the middle of the field, the only difference is that Z will cut his route back between the safeties -- his target remains the deep middle.
Cover 4: We will have tested the flat defenders with Seam and Cross to see if they gain width fast enough to keep up with FB's check Flare. Once we get them flying outside to cover width, especially on the Spread side, we can cut H's Shoot pattern back up and inside against C4 by having QB pump-fake, signaling H to cut straight downfield.
COVER 1/C2 MAN: Against Man coverage, H releases straight downfield for two steps before breaking outside. He looks for the ball as soon as he cuts -- Z provides him with a natural rub, and he can pop open right away. Z, meanwhile, releases at an angle outside before cutting back into his Shallow Cross. He "sells" a deep release to his defender with exaggerated body lean, arm action, etc., before cutting sharply back inside. He keeps his route well underneath the free safety (or safeties in C2/Man under). The QB should look to the crossing receivers -- H first, then Z.
COVER 0: Same cuts as against C1/Man coverage, except now there is no deep middle defender, so Z can turn his route into a quick Post. With the blitz threat, QB looks for the rub right now, hitting the first receiver to break clean. If he feels pressure, QB should take off playside, and X, H and Z should adjust their routes away from their defenders (our scramble rule --see page 15).
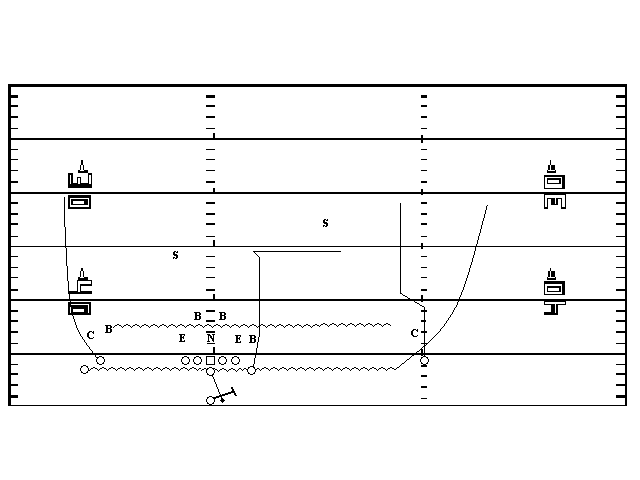
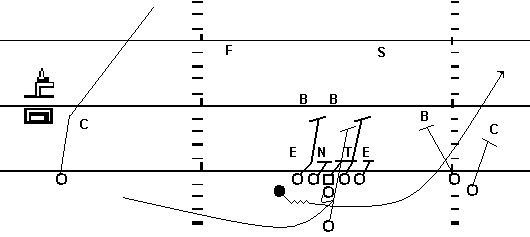
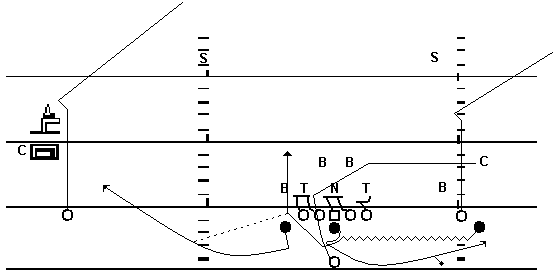
124 MESH
H motions to a yard inside Y at the snap. Y runs a Smash, H a Flat route underneath him, while Z runs a Whip Read. H and Z literally rub shoulders at the Mesh point.
C3: QB looks to H right now -- if flat defender jumps him, QB shuffles a few steps and hit Z's Whip as he snaps his head around into the hole left by the flat defender. QB throws the ball right in the hole, stopping Z in his tracks. If a hyper CB is prowling the Flat, we may pre-determine a pump-fake to H and deep shot to Y.
C2: If PCB drops, hit H now. If PCB squats or moves laterally, hit Y's Smash. NEVER TRY TO THROW OVER A RETREATING CB. Z sits in the zone window as your outlet.
C1: Look to Y to beat the safety. If the safety crowds the Bunch, come back to X on the Post. H is "Q" receiver against blitz, Z is outlet.
C0: Consider Swap adjustment at LOS (Page 4, lower diagrams). If QB has time, Y's (or X's in Swap) Smash can be a big play; otherwise, think H in the Flat, then Z's Whip Read.

In keeping with the KISS rule, I have necessarily avoided the fifty or so pages they devote to Mesh tags and variations -- but that doesn't mean the basic structure isn't incredibly powerful.
COVER 3: You're picking on the flat defender -- the SS in the diagram, or a Cloud corner. If he jumps H in the flat, you'll hit Z's Whip Read on your fifth step; if not, hit H immediately. If the corner comes up quickly after a few completions in the flat, we will predetermine a pump-fake to H and a shot to Y's Smash.
COVER 2: QB reads the PCB. If he drops, hit H in the flat. If he hangs or moves up on the Flat route, throw for Y's Smash route splitting the difference between the hash safety and the PCB. Z's Whip Read becomes the outlet as he sits in a zone hole and makes eye contact with the QB.
COVER 4: We will bracket the Bunch-side flat defender between H and Z, then throw to the open man. If he fights for width the way he should, he just opens up the Whip Read even further.
COVER 1/C2 MAN: Here we are looking to wait out the free safety and throw the Smash to Y. If the safety overplays to Bunch, we will throw to X's backside Post.
Either H's Flat or Z's Whip Read becomes an alternative if holding the ball for Y becomes impractical -- H right off the Mesh, or Z as an outlet if they switch or banjo to cover the Flat route.
COVER 0: Similar to C1 or C2/Man under, except now we have a choice: either we can bring Y in tight and Swap him for X to give greater protection, or we can choose between H and Z for a quicker throw.
If you choose Swap, look for the Smash to break clean with a lot of room to run to.
If the heat is on, look for H to pop open versus straight Man, then shift to Z if there has been a switch or banjo.
124 OPTION SCREEN
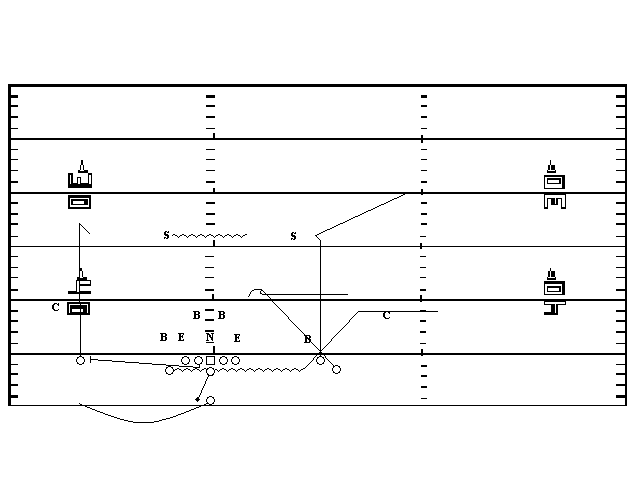
Against defenses that overload the Bunch side, we like to incorporate this Homer Rice "option screen" look into Mesh. QB reads the defensive reaction to H's motion: if the secondary slides or rotates to Bunch, or if the OLB chases H across the formation, QB calls "Short! Short!" to alert line, X and FB, then drops facing Spread and reads the CB. The Center or Spread Guard, whoever is uncovered, pulls flat down the line in the direction of X's original position, looking to kick out the first defender who shows. Rather than blocking frontside, FB now Flares backside and looks for the ball immediately after the snap (he becomes the "Q" receiver if QB exercises his screen option). If the CB comes up to meet the screen threat, QB hits X, who has adjusted his route to a 12-yard Hitch. If the CB stays home, QB dumps the ball off to FB with a blocker leading the way. If both the secondary and OLB stay in place, QB forgets about the screen and reverts to his normal Mesh procedures: he drops facing Bunch, and executes his Mesh reads. (If you're worried about defenses keying the "Short" call, have your QB also call it on a few completely unrelated plays.)
225 TRIANGLE
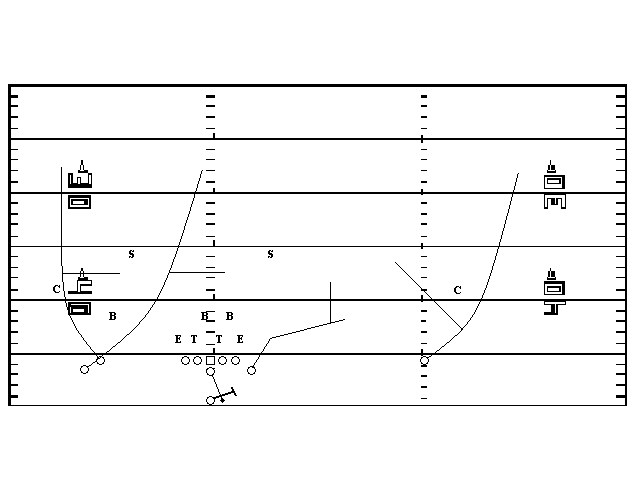
Excellent Red Zone call. X runs a Shallow Cross at +4, looking for a zone window or accelerating away from his man. We can also tag X with a Post, or at the goalline with a Fence -- he runs hard to the end line, then pivots to face the QB and slides laterally. H motions just behind Z at the snap and runs a hard Fade, looking for the ball over his inside shoulder at +10-12. Y runs an Option cut, getting behind and between LB's at +12. Y shows his numbers to QB and stays open. Z runs a Whip Read, popping open at +5-6. From a half-roll to Bunch, QB looks to H's Fade first, then Z's Whip Read. Y's Option makes him the perfect outlet. At the goalline, we may tag H with a Marker adjustment. Two yards deep in the end zone, he looks back briefly for the ball. When his man looks back, too, H plants his inside foot at +5 in the end zone and cuts back hard for the cone at the front corner of the end zone. QB throws low and hard to the spot when H looks back for the ball.
COVER 3: QB looks first for Z's Whip Read to come open, either inside or outside the flat coverage/SS. Next he looks for Y's Option route to settle in a zone window; finally, a defense that overreacts to the half-roll can be hurt by a throw to X.

COVER 2: We will look for the Fade first, then the Whip, then the Option. If the Bunch-side hash safety tries to play over the top of the Fade, we can definitely hurt this coverage with a shot to Y -- he should have plenty of room to run to.
COVER 4: Z should stop inside the flat defender as he fights for width, or run past him if he starts trying to plug the inside window.
COVER 1/C2 MAN: The Fade becomes a footrace between H and his man, with a good chance that releasing from behind Z may gain H a step or so -- throw it to him quickly, and don't put too much arc on the ball.
The Whip Read, meanwhile, can play havoc with any kind of Banjo by the Bunch defenders. Z's man will fight to maintain inside leverage, which helps Z separate quickly as he whips back around outside.
COVER 0: QB looks for the fade right away in blitz/man situations. We're buying as much as an extra second with the half-roll away from pressure, so QB should be able to see H or Y popping clear of coverage.
We try to avoid throwing back to X against Cover 0 looks -- too many teams are playing the zone blitz from this look, with unfortunate consequences if QB thinks he can gun the ball to the Under route and never sees the zone blitzer dropping back to cover.
126 SWITCH
Z reads the nearest safety on the run -- if he stays deep middle, Z runs the hash alley, looking for the ball at about +20. If the safety widens or against C0, Z breaks hard down the deep middle. If the safety floats over the top of Z's hashmark alley, Z hooks up at +14-15. Y essentially runs a Fade through the near shoulder of Z's defender. H's rule is simple -- get open. If in doubt, head for the sideline, stopping in a zone hole if one opens. X runs deep, trying to take two backside defenders with him. Don't neglect a deep shot to X if he's coming open. QB reads reaction to H's motion. Versus man, we will predetermine a deep shot to either Y or Z right off the rub. If the deep route isn't open, hit H breaking away from his man. Against zone, QB looks off deep, then throws to the area where H is breaking. This is a timed throw while short defenders are still dropping. If H's Choice route is jumped from inside, look for Z running his hash.

COVER 3: QB reads the safety's reaction to Z's Inside Vertical -- if the safety stays deep middle, Z motors down his hash alley and looks for the ball somewhere around +20; if the safety widens toward Bunch, Z cuts back inside him to the Post; while if the safety plays over the top of the frontside hash alley, Z hooks up under him at about +14 and finds the zone window.
If we feel we have a speed and/or technique mismatch against the PCB, we will try a shot to the Outside Vertical/Fade by Y. If Y can't get past that C3 corner, however, he cuts back to the sideline at around +14.
H's Choice route makes this a great combination deep shot/ball control package. With Y and Z taking off deep, H often finds plenty of room to maneuver in and settle down in a zone hole.
COVER 2: This is where Z gets to show off. No matter what the playside hash safety does, he's wrong. He's on an island where Z can cut inside him to the Post or continue straight down the hash. Outside, meanwhile, the PCB is losing ground for dear life to stay with Y. If he stays at home in the flat, Y will burn right by him -- and there is no inside-out help from the hash safety, who has his hands full with Z. Bringing the backside safety across to help is an invitation to X to score a quick six. Again, after Y and Z play clear-out, H should have lots of room to settle in against the under coverage. H releases in the direction of the flat defender to encourage him to widen, then snaps back inside him and finds the window.
COVER 4: H will have a big window inside the flat defender -- or outside him if he tries to close down inside.
COVER 1/C2 MAN: Brings the Vertical Switch/Choice package into its own. We have probably scored more touchdowns with this package against man coverage than with any other route package under any circumstances. There are just too many rubs with too many fast people headed downfield to successfully defense this man-to-man in the long run.
QB looks first for Y off the rub from Z, running to the outside deep third of the field. If Y breaks clean from the mesh, QB should hit him right away. If not, H has a very good chance of running away from coverage into the flat. If the safety is overplaying to the Bunch side, keep X in mind for a deep shot.
COVER 0: Speed is a major consideration against the probable blitz, so we ask QB to look for whichever Vertical runner (Y or Z) comes open first off the mesh; if there's no clear read, look for H to pop open into the flat a second later. Don't forget this is a Choice route -- if H's man fights his way through thhe rubs and is playing to take away the flat pass, H has the freedom to make a different cut and make eye contact with the QB.
117 SLIDE
Against zone coverage, Y runs an outside vertical pattern up the backside numbers, while H releases slightly outside then streaks downfield, trying to tie up a linebacker and a safety. Z goes in motion halfway between X and H, then fishhooks five yards into the backfield before turning downfield at the point where X lined up. X runs a quick Slant, lingering in the zone window before heading downfield another four steps and slanting in again. Against man coverage, X cuts the slant portion of his pattern short, breaking hard downfield and taking coverage deep with him. H turns his pattern into an In or Out (away from the man covering him) at +10, while Z runs a Wheel off X's backside, trying to rub his man off as he heads downfield.
COVER 3: We put the SS into a bind -- back to cover X, or up to take away thhhee wide "fishhook" flare by Z? We stretch the secondary in two dimensions to increase SS's isolation, while we run Y through the backside deep third to maintain tension and send H right down the field to pull the free safety into him.
If QB has no clear read by his fourth step, he should roll for the corner looking for X or H deep, or throw over SS's head to Z if he comes up to stop the run. H heads for the flag if he sees QB rolling in his direction.
COVER 2: The corner becomes the victim -- if he sits in the flat, X gets the ball; if he closes inside, Z catches the ball in stride and heads downfield. X and H keep the hash safeties busy, isolating the PCB with all kinds of room to run to on either side of him.
COVER 4: The method of attack depends on how they react to Trips. Do they cross-key with the backside safety? If he locks on H, he takes himself out of the play. Do they stick with the basics and have the backside safety double #1 backside (Y)? Even better -- he's out of the ballpark. Do they widen the Spread-side flat defender with Z as he comes across in motion? They're asking us to throw a quick dump to H for 5-7 yards a pop, or we can run Go and stick them for 10 yards a shot by cutting H's Shoot back inside the flat coverage when he sees QB pump-fake.
COVER 1/C2 MAN: Z will call out "Man! Man!" as he observes the defensive reaction to his motion, then cut up behind X in a Wheel route as he tries to rub off one of the defenders. X cuts short the slant leg of his route and turns on the afterburners. H is the receiver of choice as he cuts opposite his man at about +8 (almost always to the outside). QB should read the rub first for a quick throw, then look for H breaking away from his man.
COVER 0: X adjusts his route short to try and rub off Z's man; Z runs his "fishhook" Flare, but doesn't gain depth if his man defeats the rub and stays with him -- he will only turn downfield for the sideline if his man is caught up in the wash by X. QB looks for H, who has no deep defender to worry about and turns his route into a Post at +9 (he throws his defender a juke to the outside before cutting back in). If we feel 7 rushers coming, the line will call "Down" (see page 125), FB will take the frontside (Spread side) rusher, while the line will block the next five gaps toward Bunch, letting the backside rusher come free -- QB knows he is rolling to Spread when he hears the line call, and his receivers are free to cut the same way the QB is running (our scramble rule, which we practice every day) or signal a deep route by throwing a hand up as they break downfield.
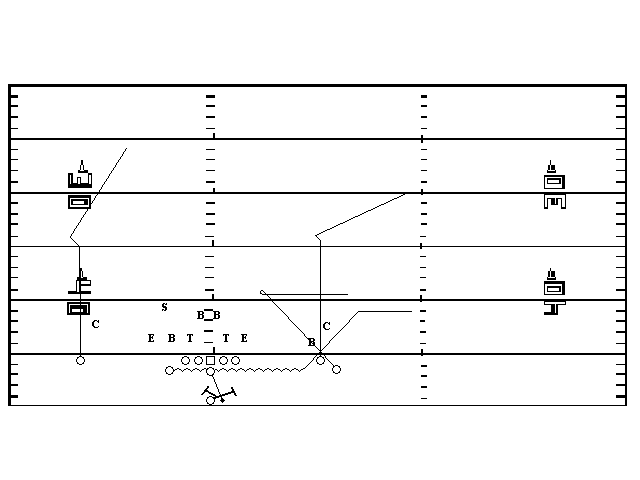
118 SHORT
One of our "two-step" passes, Short finds the weakness in Spread-side under-coverage faster than any other route package. Z goes in motion until he's about 6 yards from X, then runs a Slant; H runs a Seam, and X runs a Short -- he ends up over Z's position at the snap at a depth of +3 or so. Y runs an Outside Vertical.
COVER 3: QB takes a two-step drop, reading the underneath defender over Z (in C3, the strong safety). If he hangs in place or squats on X's Short route, drill the ball on your second step to Z as he breaks in. If the SS runs with Z, deliver a firm ball to X, allowing him to cut downfield after the catch (do not gun it -- X is running toward you). H's Seam keeps the next underneath defender inside from gaining too much width. As the C3 DBs drop, the Spread side should open up to give the QB a clear read.
COVER 1/C2 MAN: Techniques for defeating Man coverage differ for some routes. First, X will work hard to gain separation at the LOS with a quick "shake and bake" -- out-in-out steps in fast succession, followed by a hard cut inside once X's defender turns his hips out. X will continue to fight for separation, right past Z's position at the snap. Z and H run their patterns much the same as against zone, but they are looking for quick separation and a quick pass. QB should lead X with the ball if he decides to hit the Short route. This throw requires practice, but will pay big dividends.
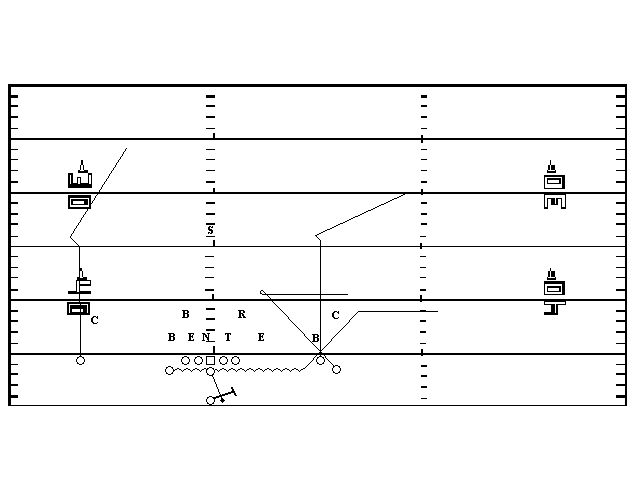
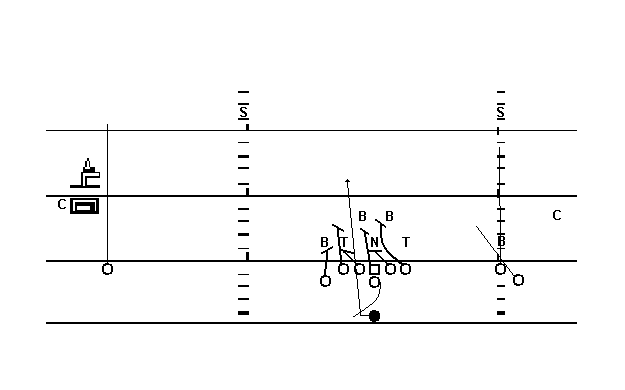
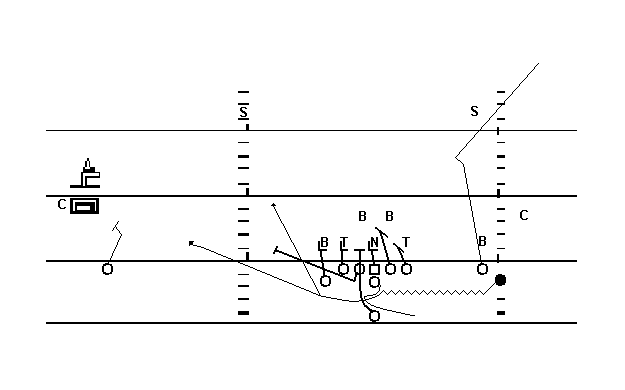
129 TURN
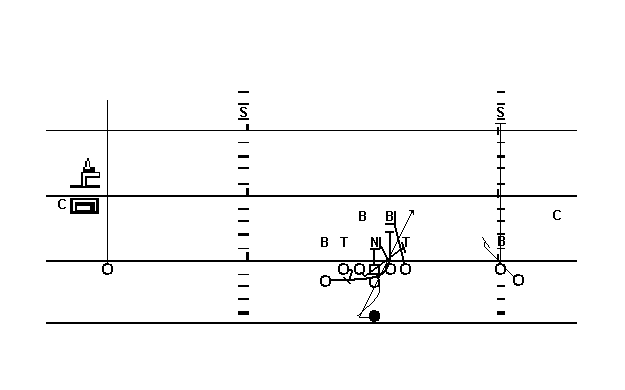
Turn gives us a similar weapon to the Bunch side that Short provides to Spread. H runs a quick Shoot at +1 from behind Z, looking for the ball as soon as he breaks outside; Y runs a Turn, breaking outside at +6, while Z runs a landmark Fade that puts him about 16 yards wide of his tackle and at about +10-12 when the ball is thrown. QB's read is the first underneath defender inside the PCB. QB is thinking Turn -- the Shoot pattern becomes a reaction if the defender takes the Turn away.
COVER 3: SS is QB's read. If he hangs and takes away Y's Turn, throw the Shoot immediately to give H space to run to. If he jumps the Shoot, Y will have lots of space to make the catch. Hit his downfield number with the ball to let him spin and head straight downfield in the same motion.
COVER 2: We concentrate on the C2 corner here. If the safety drops quickly to deep half, the PCB has a dilemma -- if he drops with Z, H's Shoot will come wide open; if he squats on the Shoot, Z will adjust his route to sit in the seam between the corner and safety. If the OLB tries to wall off Z's route, meanwhile, Y's Turn will have room to make the catch and spin downfield. If the PS recognizes Turn and comes up, we can tag Z with a Slant -- when he reaches his landmark, he will cut back inside on a skinny course looking for the ball.
COVER 4: We find this package gets defenses out of C4 faster than anything else. Pattern recognition is a major job with our semi-stacked release, complicating the playside DBs' job enormously. If they double Z's Fade, the flat defender had better get on his horse and ride if he wants to cover H. Meanwhile, will they account for Y's Turn with a cross-keying backside safety? How? If not, we have man coverage with the flat defender out of position.
COVER 1/C2 MAN/COVER 0: H's motion complicates his man's job enormously -- there are too many bodies to run through to cover the quick Shoot with any reliability. Switching won't work, either -- notice all three patterns are breaking outside, leaving an inside switcher with nothing but air to cover. Bumping coverage is probably the best solution, but we probably have a speed mismatch somewhere, most likely Z's Fade -- if QB can hold the ball and wait, we can hit a big play.
333 BOOT
Play action from the 21 Sweep and 33 Dive sequence. QB reverses out, spin-fakes to H while keeping the ball in close (no hand-fake), then flash-fakes the ball in and out of FB's pocket. Finally, he rolls to the Spread side. X has taken an Outside Vertical release, reading the PCB. If the PCB gains depth with him, he will break off to a Hitch at +12. If the PCB levels or stumbles, X will continue down the bottom of the numbers. Y runs a Shallow Cross and Z a quick Post. Y is the "Q" receiver against blitzes, although QB should be able to run away from any inside pressure. This is naked, so QB must observe the backside EOL rush angle every time we run 21 and 33. FB fills for BG, blocking anyone who rushes or replacing the ILB if he drops.
If we can get QB outside of containment with the ball, we feel we have a good play no matter what the defense does -- this is one of the few plays we consider coverage-proof. X is the primary, coming back if his defender plays it too deep, or taking off down the numbers for the deep shot if he gets any headroom from the corner.
Y's Shallow Cross may be open early if the short defenders bite on the Sweep/Dive fakes, while Z's quick Post has a chance if the outside defenders don't recover quickly enough from the fake. H also has some interesting possibilities -- often he will come through untouched. If so, he should cut downfield in a Wheel pattern behind Y, looking for the ball as soon as he's headed downfield. This gives QB a "transcontinental" throwback opportunity if no one accounts for H.
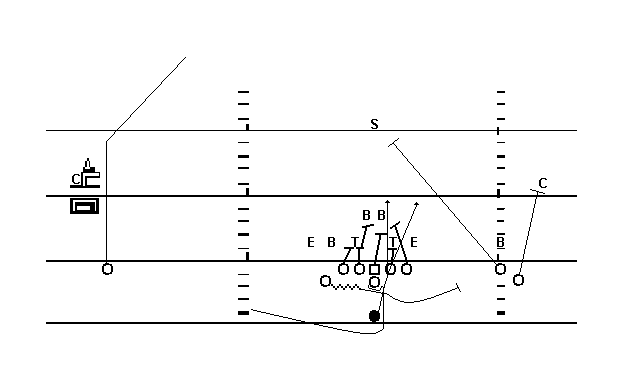
335 OVER

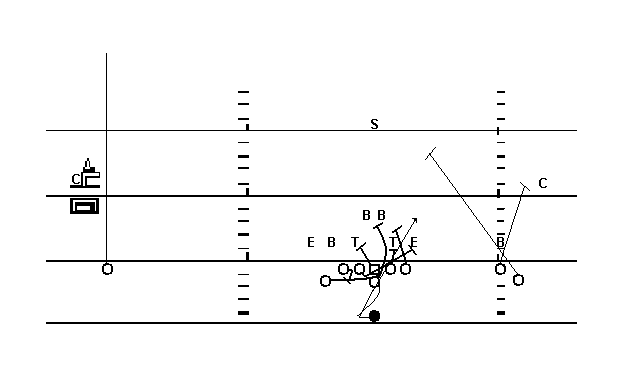
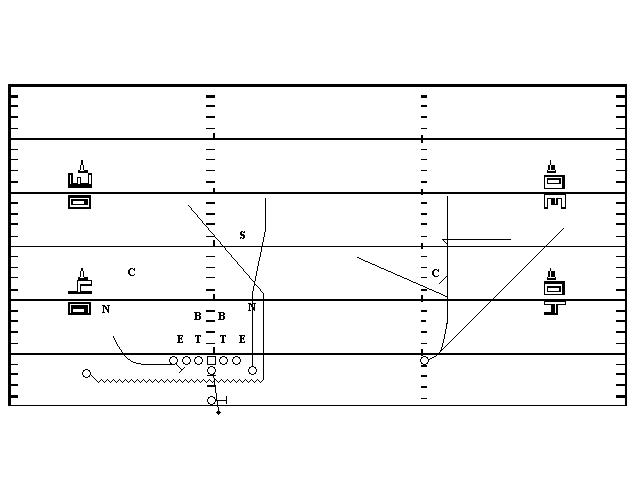
The combination of the Over route package and the Trap fake gives us a potent weapon, especially on first down. With the LB's reacting up to the fake, we give H more room to run his Cross. Against C3, the safety may jump Y's Over, giving QB a shot at hitting Z's Climb -- but only if he has an absolutely clear read.
Versus Cover 4, we like Y's chances running his Over against the Bunch-side safety. H may also pop open over the middle if FB runs a convincing Trap fake. Y and Z can both break a big play against this coverage if the Bunch-side safety and corner don't get inside help deep.
Against C1 or C2/Man, we switch Y and Z's assignments to create a rub right past the LOS and pop one of them open quickly -- usually Z's Over route. QB can throw it almost like a quick Slant if he sees Z come open off the rub -- Z should be ready to receive the ball right away.
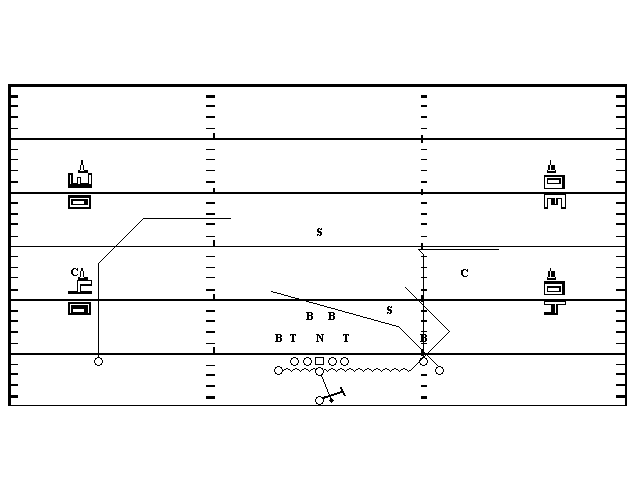
21 SWEEP

We solve the problem of running outside without altering our Bunch motion by joining in the proliferation of the Fly Sweep series (many thanks to Coach Bruce Eien of Brethren Christian HS in Cypress, California). The first play in the sequence sends H in motion (which should be identical to Bunch motion for the first few steps). At the snap, QB reverse-pivots and hands to H, then fakes the Dive to FB, and completes the sequence by rolling to the Spread side faking the naked Bootleg. Y and Z get to have some fun on this play -- they use a Mesh-like release, then take out the PCB and PS. Bunch Guard pulls and kicks out the first color past BT (in the diagram, the OLB/Nickel back over Y). H reads BG's block and cuts to daylight. FB fills for BG and takes a good shot at that playside ILB or DT. We can also block this Zone, with no guard pulling. This decreases our blocking at the corner, but makes it almost impossible for the defense to distinguish between Sweep and Dive.
3-4/5-2 Oklahoma: Against an Okie look, we can block Sweep either as diagramed or with Zone blocking. Generally, we will use the pulling guard against fronts that outnumber us at the POA, and the Zone method against all other fronts, so that we retain the unity of apparent intent between the Dive and Sweep -- it makes it much harder for the defense to spot the POA if the blocking remains the same for Dive, Sweep and Bootleg.
Okie defenses have adjusted to our Sweep by slanting their line away from motion, crashing the playside End/OLB in toward the QB, shooting the playside ILB into his C gap, and bringing the FS down toward the Bunch. They have to wait until the ball is snapped, though, since any premature movement by the free safety would invite a Bunch pass with a deep middle route to take advantage of his being out of position, like Switch, Over or (particularly) Wheel. Bunch Guard should be aware of the crashing End/LB as he pulls, but otherwise we think we still have a good play. If we're Zone blocking, Dive can really pop through a crack over Bunch Guard.
Our Zone rules:
Bunch Tackle: Reach C gap
Bunch Guard: Rip outside B gap defender to 1st LB inside
Center: Reach frontside A gap to 1st backside LB
Spread Guard: Reach backside A gap to free safety
Spread Tackle: Reach backside B gap to free safety
Fullback: Fake Dive, help frontside B gap defender to backside LB
4-4 teams tend to adjust to our Sweep by bringing their playside End hard outside and upfield, scraping both ILB's to flow, sending the corners to play Cover 2, and bringing the safety up hard to the Bunch. Some also shoot their OLB's from head-up over Y into the backfield. With Zone blocking, Dive can go a long way against these adjustments.
5-3: With any kind of reduced/eagled front, we feel we are better off blocking this Zone. I've diagramed it with BG pulling, but see Page 60 for the Zone rules.
Miami 4-3: Against this look, we will normally run the Sweep and Dive with Zone blocking. We're less worried about getting the big push from the first to the second levels, but we DO want to get quick lateral movement on the defensive line and then run -- "reach and run" is our motto here. Notice H doesn't belly back as much after the hand-off as he does when the guard is pulling -- since there's no need to help the guard set up his block, it is to our advantage to get the ball outside as fast as possible.
4-3 teams, especially those running Jimmy Johnson's version, adjust to the Fly series by bringing up their safeties into running lanes quickly, which plays right into our play-action strategy -- see pages 54, 108 and 109.
33 DIVE
Fly play number 2. After faking 21 Sweep, QB continues his spin and hands to FB, then runs his 333 Boot fake while reading the charge of the backside OLB. FB hits the bubble over BG or BT, or runs to daylight if they are both covered. H will block the playside OLB if he crashes inside. The play is run identically to the Spread side as 37 Dive to complement 49 Sweep where Z carries the ball. Emporia State "superback" Brian Shay set national records in the mid-90's running primarily this play, which hits the soft underbelly of the defense after establishing the outside run and pass threats.

3-4/5-2 Oklahoma: Our blocking rules for 33 Dive are:
Bunch Tackle: Block out on C gap defender
Bunch Guard: Block out B gap defender; Combo A gap to B gap LB
Center: Combo frontside A gap defender to A gap LB
Spread Guard: Combo 0 technique to A gap LB
Spread Tackle: Rip through man over to backside OLB
4-4:
See Page 64.
5-3:
See Page 64.
Miami 4-3:
See page 64.
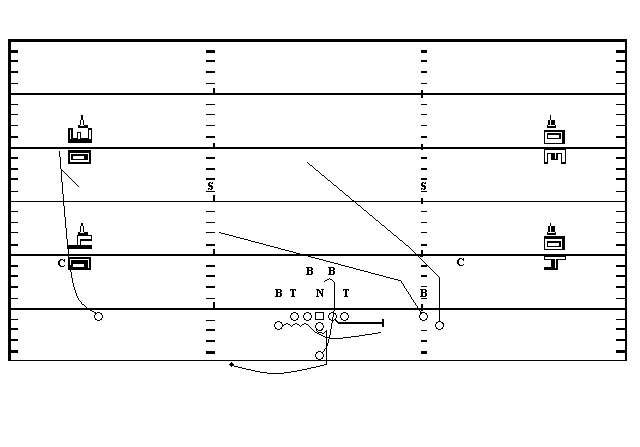
34 COUNTER
FB's lateral step resembles 36 Zone, but he cuts back and follows Spread Guard and H through the hole. Bunch side of the line seals to the inside, SG kicks out defensive #2, ST hinge blocks (like backside sprint-out pass protection) to pick up a crashing or slanting defender, while H pulls through the hole and walls off pursuit.
From the Swap adjustment (page 4, bottom diagrams), we can motion H to form the Bunch, then still run Counter by having Y pull and wall off in H's place.
3-4/5-2 Oklahoma: This is a straightforward blocking scheme against the base Okie. If the Center can handle the 0 technique by himself, Bunch Guard comes off the double-team looking for the backside ILB. H turns up past the Center's block looking for backside penetration.
4-4: If we are having problems blocking this as shown (if the playside DT is busting through, for example) we will trap him with Spread Guard, block out with Bunch Tackle, and turn downfield one hole sooner. H should be aware that in that case he is cutting right off the Center's tail for backside flow.
5-3: This is not our first choice against this defense -- we would rather play inside/outside with the Dive/Sweep combination, and more importantly, throw the ball! Still, we can get yards if we are careful how we block it. The blocking scheme diagramed will only work if the MLB is flowing hard on FB's first step. Otherwise, we will block Bunch tackle down on the 3 technique DT, send Bunch Guard to pick off the MLB, play the Center head-up on the 0 technique, and trap the playside DE with Spread Guard. This requires a change in the backside blocking, however -- both Spread Tackle and H will reach playside to cut off penetration.
Miami 4-3: The Counter depends for its success on misdirection -- on getting the linebackers to flow with the FB's first step. BG and BT double-team the 3 technique tackle, looking to push him to the second level, or else waiting for the Mike LB to come to them before breaking off the double team to seal the LB. SG has a tough inside-out trap block, since a well-coached 5-technique DE will close down inside when he sees BT disappear and will try to wrong-shoulder the pulling guard. SG should be ready to log him inside if that happens. H has a key block on the Will LB, looking for him inside BT's block. FB needs to get through the hole and downfield -- there is no time to dance against this defense.
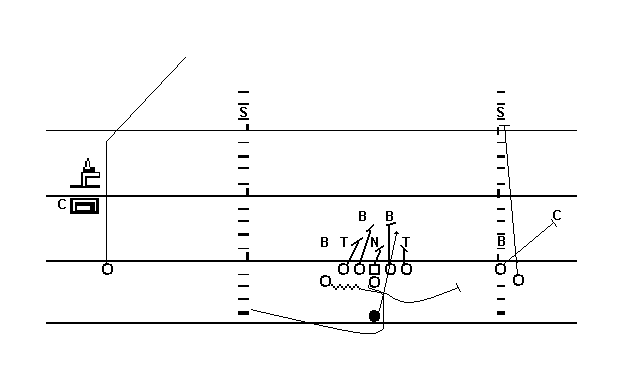
35 TRAP
Can be run with or without motion. If the OLB over H pursues motion across formation, leaving DT with contain, we will trap inside him all day long. With motion, also functions as a "Bunch draw."
Center: Block backside - If no backside LOS defender, block straight ahead.
Spread Guard: Continue through A gap until you hit somebody (Usually man in front of center). If center blocks your man (NG) too, combo to backside LB.
Bunch Guard: Pull playside and kick out first defender past A gap.
Spread Tackle: Nearest LB.
Bunch Tackle: Reach block toward center. (Rules courtesy of "Dum Coach.")
When we find defenses cheating toward Bunch and the field, we will run Trap from the hash without motion. Trap then becomes a great way to pop the FB into the secondary with a full head of steam.
3-4/5-2 Oklahoma: After all these years, I still like trapping inside that DT/DE on the Spread side if the OLB outside him follows H's motion across the formation. It's asking a lot of the DT/DE to keep containment and also shut down the quick FB Trap. If the OLB stays home, so does H.
QB reverse pivots and gives to FB as close to the midline and as far back in the backfield as we can manage -- we want this to hit as fast as possible, and to give FB as much room to maneuver as we can.

4-4: Not our first choice play against the Split 4, but we can and have made it work. For a counter trap to H (very handy against Split-4 looks) and play-action complement, see pp. 103-104.

5-3: This front is a Trap rule-breaker -- to get the best angles, we need to change what we're doing. Blocking a reduced 5-3 front by the rules would put both Center and Bunch Tackle on the 3 technique over Bunch Guard, and no one on the DE outside Spread Tackle.
Instead, we will try to block Trap as diagramed.

Miami 4-3: This is, annoyingly, another rule-free situation. I have diagramed the best way to play the Trap against this front with the BG pulling and trapping. You might want to consider an alternative, namely running Trap with the SG pulling. If so, be prepared to run 335 the same way against that opponent.
36 ZONE
The foundation of our inside ground game.
3-4/5-2 Oklahoma: If an offensive lineman is covered, he blocks the man on. If uncovered, he will step playside and double with the covered lineman. At this point they will stay engaged with the double team until they reach the second level or the second level comes to them. In the event that the uncovered lineman has no one to double team, he will work to the second level with his shoulders parallel to the LOS. We work hard to distort the defense with the double team so that FB may have a cutback lane. FB takes a lateral step (setting up 34 Counter), then takes the handoff and looks for daylight. Can also be run from Swap (page 4, bottom diagrams) with Y taking H's place as a blocker.
4-4:
See Page 78.
5-3:
See Page 78.
Miami 4-3:
See Page 78. As with any gap control defense, we will end up with several double teams on the first level. Linemen work through to the second level with shoulders square.
To quote once again the advice of Coach Jerry Campbell to offensive linemen on how to determine which way to step: "Find the nearest defensive ear and stick your helmet there." After that, it's four hands on the DL and four eyes on the LB.
37 DIVE
Fly play number 2. After faking 49 Sweep, QB continues his spin and hands to FB, then runs his Boot fake while reading the charge of the backside OLB. FB hits the bubble over SG or ST, or runs to daylight if they are both covered. H will block the playside OLB if he crashes inside. The play is run identically to the Spread side as 33 Dive to complement 21 Sweep where H carries the ball (see page 58). Emporia State "superback" Brian Shay set national records in the mid-90's running primarily this play, which hits the soft underbelly of the defense after establishing the outside run and pass threats.
3-4/5-2 Oklahoma:
Our blocking rules for 37 Dive are:
Spread Tackle: Block out on C gap defender
Spread Guard: Block out B gap defender; Combo A gap to B gap LB
Center: Combo frontside A gap defender to A gap LB
Bunch Guard: Combo 0 technique to A gap LB
Bunch Tackle: Rip through man over to backside OLB
4-4:
See Page 83.
5-3:
See Page 83.

Miami 4-3:
See page 83.
38 DRAW
From 113 Go action, FB sets up in his normal pass protection technique. QB drops behind him, holding the ball in a passing grip and sliding it into FB's gut as he continues behind him to his normal passing depth. FB needs to take a full "One one-thousand" count before he takes off to encourage the underneath defenders to continue dropping.
Running the R&S version, after we burned the OLB once with Draw, no one went near H's Shoot pattern from Go for the rest of the game. Although we generally only call Draw when defenses drop their EOL defender on the Spread side into coverage, we have run right by defenders who are so intent on rushing the passer that they miss the backside hand-off. Having that defender over H drop is actually very common after we hit a few passes to H.
49 SWEEP
3-4/5-2 Oklahoma: Against an Okie look, we can block Sweep either as diagramed or with Outside Zone blocking. Generally, we will use the pulling guard against fronts that outnumber us at the POA, and the Zone method against all other fronts, so that we retain the unity of apparent intent between the Dive and Sweep -- it makes it much harder for the defense to spot the POA if the blocking remains the same for Dive, Sweep and Bootleg.
Okie defenses have adjusted to our Sweep by slanting their line away from motion, crashing the playside End/OLB in toward the QB, shooting the playside ILB into his C gap, and bringing the FS down toward the Spread side. They have to wait until the ball is snapped, though, since any premature movement by the free safety would invite an R&S Trips pass with a deep middle route to take advantage of his being out of position, like Go or Slide. Spread Guard should be aware of the crashing End/LB as he pulls, but otherwise we think we still have a good play. If we're Zone blocking, Dive can really pop through a crack over Spread Guard.
4-4 teams tend to adjust to our Sweep by bringing their playside End hard outside and upfield, scraping both ILB's to flow, dropping the corners to play Cover 2, and bringing the safety up hard to the Spread side. Some also shoot their OLB's from head-up over H into the backfield. With Zone blocking, Dive can go a long way against these adjustments.
5-3: With any kind of reduced/eagled front, we feel we are better off blocking this Zone. I've diagramed it with SG pulling, but here are the Zone rules again:
Spread Tackle: Reach C gap
Spread Guard: Rip outside B gap defender to 1st LB inside
Center: Reach frontside A gap to 1st backside LB
Bunch Guard: Reach backside A gap to free safety
Bunch Tackle: Reach backside B gap to free safety
Fullback: Fake Dive, help frontside B gap defender to backside LB
Miami 4-3: Against this look, we will normally run the Sweep and Dive with Zone blocking. We're less worried about getting the big push from the first to the second levels, but we DO want to get quick lateral movement on the defensive line and then run -- "reach and run" is our motto here. Notice Z doesn't belly back as much after the hand-off as he does when the guard is pulling -- since there's no need to help the guard set up his block, it is to our advantage to get the ball outside as fast as possible.
4-3 teams, especially those running Jimmy Johnson's version, adjust to the Fly series by bringing up their safeties into running lanes quickly, which plays right into our play-action strategy -- see pages 54, 108 and 109.
SUPPLEMENT AND SPECIALS:
Some of the following plays are additions to our core plays which allow us to adapt to special defenses, tendencies, or situations. We consider the plays on pp. 93 - 116, including the two goal line passes, to be part of the Wild Bunch supplement.
The others (pp. 117 - 118) are considered specials -- additions to our arsenal which we will install during the season against specific opponents, and/or to help break tendencies which we have developed. If we have time during pre-season, we may demonstrate one or more of these to our players to keep their interest -- running 124 Mesh to perfection 100 times may be necessary for its proper execution, but it doesn't necessarily excite anyone. These plays can help maintain player interest even as they help throw off defenses.
32 CRASH
Coach Nick Cursley of Kent Exiles in England reports that the combination of Bunch passing and the Fly Sweep is causing an interesting defensive reaction. The defense waits until after H has passed behind the QB, then drops into an over-shifted pass coverage to the Bunch side only. Coach Cursley's response was straightforward, but perfect -- when they give you a soft corner, you have to exploit it. In Crash, the ball is snapped when H passes behind the QB, who open-pivots and hands to the FB. He follows his lead blocker, H, and cuts off his block. Y looks for the man tracking H, while Z looks for the first short defender inside him, and H blocks the first color that shows past Z. The line blocks Outside Zone, looking to "reach and run" on the defense. Alternately, we can snap the ball a count later, block H on the DE, and pull the tackle.
103 READ
Recent feedback from Wild Bunch coaches indicates a need for a no-motion play that takes advantage of the lateral stretch on the secondary to the Spread side. Read provides a time-tested R&S addition to Seam and Cross. It has proven particularly effective against pattern-reading Cover 4 defenses.
At the snap, X takes an Outside Vertical release which he may break into a Slant depending on how the corner is playing him. H takes the same Shoot path he would on 113 Go -- if he sees the QB pump-fake, he turns downfield and looks for the ball over his inside shoulder. Y and Z run Switch routes up the backside numbers and hashmarks, respectively, although both also have the option to break In at +7 yards, again depending on the play of their defenders. QB takes a 3-step drop and reads front (X) to back (Y). Read becomes a way of probing zone coverage while also gaining quick separation against man defenders.
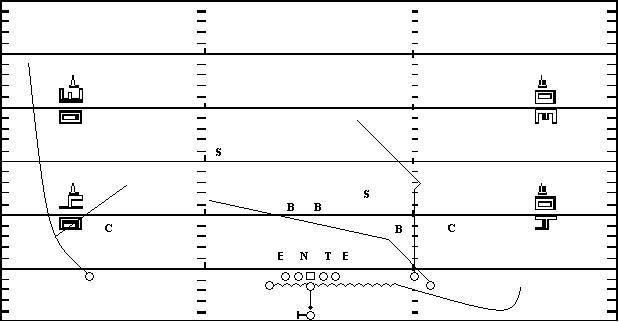
SWAP 334 FLOOD
If we can establish 34 Counter, we can make some yards with our Flood play-pass. We particularly like this down around the defenses' 30 yard line, where we feel we can hold the ball from Swap long enough to wait for X's Smash cut to come open -- if we pick up the blitz, we can KILL defenses with this. Zone coverage often breaks down against the tandem of X and Z heading downfield at full speed -- the Bunch-side hash safety in C2 often targets the wrong receiver, for example, focusing on X while Z runs right by coverage. The Flat route here comes open a full second later than its Mesh counterpart, so it can really have some room to run to after X and Z clear out the deep coverage. Against Man coverage, H also has two rubs to run through.
P.S.: The defense diagramed is the semi-legendary "2-Level" 5-5-1. Check out the Deep Safety!
SNUG 111 SPECIAL
This introduces a different alignment concept, bringing Y in tight to the Bunch Tackle. Snug allows us to throw R&S routes with an extra blocker backside, much as Swap does with Bunch routes. This play, a frontside Choice package for X, can be run just as easily from our regular formation. If we do run it from Snug, Y has the option of staying home and blocking, or blocking and delay-releasing into backside coverage.
H and Z head straight downfield before Z slants back toward the Bunch side, dragging as much coverage as they can with them -- the idea of this route package is to give X as much room to operate in as possible. He will signal to QB as he lines up which of his routes he will run -- Seam, Slant, Stop, Out or Fade. Running this from Snug gives us more time to hit a long shot to X (or H or Z, for that matter), but I must admit the idea is contrary to the whole R&S philosophy of spreading out and throwing. What Snug does is give us a fighting chance against surprise blitz packages until we can work out an adjustment -- we can still throw R&S routes in the meantime.
114 OUT
The double quick out is a favorite of June Jones, and fits in well with the Wild Bunch philosophy. The ball gets out FAST with this 3-step route package, and it's a classic throw short - run long proposition. We consistently see big yards after catch from this package, which is especially dangerous to man coverage.
Z goes in motion about 3 yards outside H, and they both run 6 yard Outs, while X runs the same Outside Vertical route he would in 113 Go, and Y runs a quick Slant. The QB's read consists of checking the leverage on H and Z. If both receivers are being played soft (5+ yards of cushion), QB should hit the Out that has more room to run to -- almost always Z, so he reads Z, then H. If H and Z are being played tight, QB looks for inside leverage on one of them (if they are being bracketed by 2 banjoing DB's, for example, H will have inside leverage on him and Z outside -- so hit H). If both are covered with tight outside leverage, QB looks for Y's Slant -- we can also tag Z and/or H with Slants to take advantage of the tight outside coverage.
115 IN
Another favorite of June Jones, who calls it "Levels." It is excellent for attacking Cover 3, as a variation on the four-verticals plan of attack. Z goes in motion to about 3 yards outside H, and runs a 4-yard In route. X runs a 5-yard In, while H runs a 12-yard Angle route -- he slants outside to a depth of about +5 yards, stems vertically, then breaks in at +12. His outside release is important so that Z doesn't screen him from the QB's view. Y runs an 8-yard Out, while FB checks the weakside rush before releasing on a Seam route. He reads the CB on his side while releasing -- if he squats or man-locks on Y, FB will break back down his Seam route toward the QB at about +12 yards.
The QB reads Y first. If the Out is there, throw it. If not, he locks on the weakside hook-to-curl defender, usually the Will LB. He has him bracketed short and long with H and Z, and looks to hit the open man. If both are covered, he comes off to X trailing the play. X will settle in the hole between the flat and hook defenders against zone, or accelerate away from a man defender.
105 HITCH
This is a combination of the Coverdale/Robinson Fade for the Bunch side and a Hitch or Stem route to the Spread side. Z runs a hard Fade (like H in 225 Triangle - p. 32) and Y runs a five-yard Out underneath him. Z should aim for a spot 6 yards from the sideline at about 20-25 yards deep. Y makes an inside fake before breaking outside against man coverage, or "squares off" his Out route against a zone. If an outside short defender (like a Cover 2 corner) squats outside, Y should "sit down" in the zone window to the inside of that defender.
While Y and Z are running the Fade and Out, H clears out deep on a Seam or Outside Vertical route -- just take off down the nearest hashmarks and attract the nearest safety -- while X runs a 6-yard Hitch or 15-yard Stem route (Hitch against C3, Stem versus C1/C2 Man). The Hitch is self-explanatory; the Stem starts off like a Go route (Z in Flood, p. 95), but X breaks his hips down at +13 yards, plants his outside foot at +15, spins inside to face the QB, and comes back downhill hard for 2-3 yards to get separation from a man defender. While he's breaking down and before he plants and pivots, he should be pumping his arms extra hard so that he actually appears to lunge forward at the defender.
This way you have a good route package against any coverage. The QB looks first to the Bunch side against C2, and the Spread side against C3, C1 or C2 Man. If your QB senses blitz, he should throw to Z if he's reading the Bunch side, or to X if he's looking to the Spread side first.
337 TRIPLE
This is a counter to the 49 Fly Sweep that is also a play-action pass. It is inspired by Penn State's use of an option QB (Michael Robinson) at a WR position. It could be used in the Wild Bunch to take advantage of defenses that send someone across the formation with the motion man to counter the Fly Sweep, but it adds a dimension that a basic bootleg doesn't have -- the option play to the Spread side. If you're gifted with both an option and a passing QB, this is a way to play them both simultaneously.
The QB reads the reaction of the defense as Z goes in motion. If no defender follows Z across in motion, the QB hands the ball to Z after the snap, fakes 37 Dive, and fakes his bootleg roll to the Bunch side. H drop steps and gains an option-pitch relationship to Z. Z options the EOL defender. If Z keeps, H should follow him downfield, maintaining the proper 4x4 yard relationship to him, looking for a late pitch. If H has a decent throwing arm, he can also throw a pass to X or Z after taking the option pitch.
If a defender comes across the formation with Z, QB takes the snap, fakes to Z, and bootlegs to the Bunch side with FB, Y and X running patterns toward the side he is rolling to. Z continues straight downfield after his option fake and H can turn his option path into a Wheel route, as well. The line blocks aggressively, but cannot go more than 2 yards downfield. They should block inside Zone, waiting for the second level to come to them in response to QB's fake to FB.
110 SWING
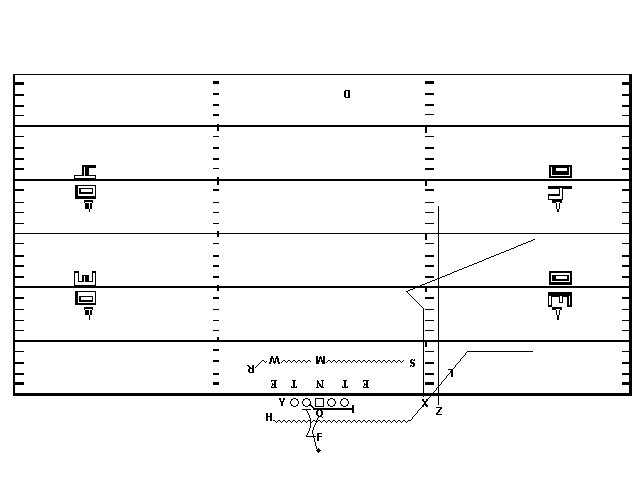
The Swing route package is designed to take advantage of coverages that do not devote enough resources underneath to the short side of the field when the Spread side of the formation is set wide and Z goes in motion to form R&S Trips to the wide side. The QB takes a three-step drop as he reads Y.
Y releases diagonally outside focused on his defender. If the corner loses ground (zone or loose man coverage), Y cuts sharply inside on his second step on a Barrier Cross pattern which takes him through the downfield shoulder of the first inside pass defender. Coaching Point: Y must swim through the contact, keeping his eyes downfield and "selling" his pass route to the defense (and officials). If the CB squats or comes forward from a loose position, or presses from an inside tight position (man/blitz coverage), Y releases outside but then bends inside on a Slant/Skinny Post route and looks for the ball immediately.
FB swings outside on the snap, aiming for Y's original starting point, and looks for the ball immediately -- he is the Q receiver in this route package. If Y breaks sharply inside on his Barrier Cross route, the QB will dump the ball out to FB right now. If Y cuts "skinnier", QB will hit him instead with a quick pass. H, Z and X all run Outside Vertical routes -- Z goes in motion halfway between H and X.
23 SCISSORS
A possible inclusion in the Fly Sweep series, 23 Scissors takes advantage of defensive over-pursuit to hit back hard at the defensive core. H loses ground after the snap, hiding in the backfield for three quick steps before taking the ball from QB and cutting off SG's block to daylight. The better the defensive flow, the better Scissors works.
X, Y: release downfield to pull the DB's with you and set up play-action (p. 103).
Z: Motion to behind BG at snap, QB fakes 49 Sweep, block any outside defenders that show, or continue fake outside.
FB: fake 37 Dive; fill for pulling SG.
BT: Inside gap, down, LB
BG: On, gap, LB -- zone man on with BT to second level
C: Gap, on, LB
SG: Pull and kick out EMLOS; log him if necessary
ST: On, outside, LB
QB: Fake 49, 37; hand to H; drop to fake pass
323 QUICK POST

Once we get 23 Scissors going, this play-action becomes a staple. We might only run Scissors once or twice a game; but after opponents have seen Scissors, we will run 323 at will, since it offers complex play-fakes, two built-in deep shots, and a good ball-control check-down sequence. The double team and guard pull exert a tremendous play-action effect on the entire defensive left side. QB should decide pre-snap which side he wants to go to - safety location, field, etc., based on scouting. The play fake gives him time to look deep first (to X or Y), then check down to Z or H respectively.
BT: Block down, double-teaming or filling the B gap
SG: Pull and block EMLOS
X: Fly downfield -- look for the ball only if you run past coverage
Z: After clearing the backfield, run a Sail route to about +10
Y: Quick Post route, breaking at +5 -- to the deep middle against C2 or C0, skinnier against C1/C3
H: After clearing traffic, break out at about +4, aiming for a point on the sideline at about +10. Look for the ball as soon as you cut outside.
27 BELLY
A number of coaches have asked me about including the option in the Wild Bunch. Apart from running a QB/FB Speed Option to Spread if a safety follows H across the formation every time he goes in motion, I don't see a practical way to include the option in the Wild Bunch that would justify the extra practice time. We have a method of attacking inside, outside and backside from one play sequence -- the Fly Sweep series -- and we spend enough time perfecting the Fly to discourage adding an option just for its own sake. I also remain to be convinced that a QB can give both the option attack and the dropback passing game the attention each demands.
I have instead included a way to read a defensive lineman and take advantage of his reaction no matter what he does, with a play-action threat included as well (p. 105). In Belly, Z goes in motion to behind the BT, then takes either a fake or the ball from the QB and heads off-tackle, outside the Read. The FB runs a tight course over SG's inside foot, opening his arms to mesh with the QB and get the ball or fake inside the Read. The QB open pivots, locking his eyes on the Read (the first defender on or outside ST) and meshing with the FB (this is a straight wishbone/spread option triple option mesh). If the Read does anything other than moving straight down the LOS to attack the FB, the QB gives to the FB and continues outside, faking to Z and sprinting wide. H blocks out on the EMLOS defender, while ST, SG and C block inside veer. BG blocks inside gap through to the second level, and BT blocks inside through to the third level, looking to cut off alley pursuit. X and Y release deep to run off outside coverage.
327 KEEPER
If we can get 27 untracked, the outside QB keep, with its run-pass option (which, unlike the running QB option, I have never abandoned over 28 years of coaching), constitutes a terrific threat to the defensive perimeter. The Belly fake makes it much simpler for the QB to escape containment with the ball than with a conventional sprint, roll or "dash" pass. (To coaches who teach spilling the ball in favor of containment, I answer, with the QB running wide and three receivers putting playside defenders in a run-pass dilemma, "Spill this.")
X runs a simple Outside Vertical route. H releases outside after faking a block on the EMLOS defender, heads downfield, then breaks outside at about +6, looking for separation from a man defender or a zone window in which to sit down. He should snap his head around at the break and look for the ball immediately. FB continues straight downfield, splitting twin safeties or just to the playside of a single safety. Y runs the same route X does in 103 Read (p. 94), while Z looks to log any outside rusher.
With FB occupying the playside safety and H pinning down underneath coverage, QB should have a very clear read once he gets outside with the ball. If the corner comes up to stop the run, he hits X; if the CB covers X, the QB is free to pull the ball down and run. If the playside safety or under-coverage (in Cover 4, for example) flies outside to complicate his read, he knows to look inside for his next progression -- H or FB.
120 ARROW
A strong complement to 124 Mesh. Once defenders get conscious of Z's Whip Read, we send him inside on a Shallow Cross. Y's 9-yard Out makes room for the signature "Arrow" or "Texas" route by H; Y can also gain quick separation from defenders looking for a Smash cut. We also tag this as Y Post after we run it this way a few times -- just as Y's man thinks he has this new pattern recognized, we leave him spinning like a top. Flat defenders, either straight man, banjo or zone, will get caught flat-footed by the Arrow after a steady diet of flat routes by H. X's backside Dig, with half the width of the field to operate in, is especially hard on Post-conscious man defenders.
121 IN/SLANT
The In/Slant combination made famous by Jerry Rice and Bill Walsh. H clears out inside coverage, Y releases at the inside shoulder of the outside defender, while Z starts toward his outside shoulder before cutting sharply up and In. If the defense tries to stop X's Slant by bringing help over on the inside, they open up the In combination. On the other hand, leaving our best receiver in single coverage and lots of field to run to is not percentage defense, either. A great end-of-half route package, as Coaches Coverdale and Robinson point out. C2/loose Man under is especially vulnerable to a big run after catch by either X or Z.
321 WHEEL
With Bootleg and Dig, this forms the play-action complement to the Fly Sweep and Dive. Safeties who fly up to stop the Sweep at the LOS can be badly embarrassed by this play. QB fakes both the Sweep and Dive handoffs, then drops to pass. Y mimes a block on the short outside defender, then continues to the flat. Z similarly threatens a block on the defender over Y before breaking off into a Slant/Shallow Post. H continues outside on a Wheel route, cutting downfield about 3 yards past Z's original position. H and Z are both Q receivers on this route. X runs a Go pattern and will only look for the ball if he runs by coverage. Against a single safety (C1/3), Z will run a skinnier Post.
349 DIG

This play-action complement to 49 Sweep also brings the Dig route package into our repertoire. X runs a Post, H a Shallow Cross and Y a Dig. Z can either Swing playside or block at the edge. H and Z control the under-coverage, while X keeps the deep safety or safeties honest. Y should gain separation from a man cornerback, or find a zone window to sit down in as he crosses the field. Facing a zone, Y should throttle down to about 70% speed to give him more "loiter time" in the zone windows.
We get a pre-snap read to see if the X Post will be open. That is where we want to go first, especially in a short yardage situation. If X is taken away by a press corner to his inside (or for any other reason), H's Shallow Cross is our next choice -- the cross away from flow catches the defense off guard, and it also works against man. The Y Dig is the third choice, but often breaks open against zone. If needed, you can tag the preferred primary route (i.e. Y Dig, H Cross, etc.)
222 DEUCE
I have used this play in various forms for years as a reliable two-point conversion shot (as the name indicates), but it also has value on the goal line and as a 3rd-and-short play. I have diagrammed it here from the five yard line.
H starts in motion toward Bunch, but the ball is snapped when he is directly behind Bunch Tackle. From there he runs a shallow Shoot route. Z runs an Option route at about +10. Y runs a Barrier Option route -- he runs through the outside shoulder of the man covering H, then settles at about +5 just outside Bunch Tackle and slides laterally, making eye contact with QB only if he is open.
QB, rolling to Bunch, looks first for H breaking open quickly. If he is covered, switch to Z, then Y. Finally, X has run a Corner route and is now running along the back of the end zone. QB should look for him before he pulls the ball down and runs for the flag at the corner of the end zone.
215 GOAL
We attempt to stretch the defense horizontally, with the QB threatening to break contain by rolling to Spread. Y runs a Hitch to the backside, which can become a good throwback route if his defender gets sloppy when he sees QB rolling the other way. X cuts to the back corner of the end zone, then breaks back across the end line. H curves out and downfield as far as he needs to for the 1st down or touchdown -- sort of a Quick Sail route. (If H's defender has success in playing him inside-out, we can tag H with an Arrow.) Z motions to Spread, and the ball is snapped when he is about 5 yards outside H. He sprints for the sideline, gaining about +2 yards by the time he passes X's original position. Z should look for the ball right away -- if QB gets pressure from the DE, Z and his man will end up in a foot race for the end zone. QB looks through the DE to H: if H is open he throws right away; if H is covered, QB concentrates on getting outside the DE while his eyes slide to Z, then X.
MAX HINGE
The following three pages lay out our eight-man protection (Max) passing game. We can call "Max" in the huddle; or at the line; or we can call "Swap" in the huddle or on the line, then adjust to "Max" if QB sees additional pressure coming. These three route packages are all designed to combat man coverage with maximum blocking and two-man pass pattern misdirection.
The two-man Hinge is credited by Coverdale and Robinson to Homer Smith, although as they note it may be older. It has the advantage within the Bunch Attack of resembling the Vertical Switch package very closely, up until the instant Z breaks back upfield. X hesitates off the line to let Z go first, then runs a Flag with a pronounced outside burst, then a vertical stick, and finally a hard cut to the corner. Z should "sell" his route as a deep shot, then come under control (even as he increases the speed of his arms pumping), spin inside toward the QB, and finally break sharply back to the outside.
Straight man coverage will have a tendency to interfere with itself as X and Z rub at their release and then again downfield, while a defensive switch leaves Z wide open when he breaks back outside away from the inside switch defender.
MAX TWIST
Our nickname for this package is "dueling banjos", since any attempt by the two man defenders to switch receivers at the outset will come to grief when they cross again downfield.
Z releases inside, looking to rub his man off as he passes underneath X. This package also resembles the Vertical Switch so far, until Z nods to the Post at +10, then cuts back for the corner, looking for the ball as he breaks. X has released outside, then turns his Middle Read into a "skinny" Post at +12 after sharply nodding to the outside. The two excellent man-beating routes are packaged here in a way that makes coverage difficult whether the defense plays it straight or attempts to switch off.
MAX WRAP
A third way to mess with tight Man coverage, this package is good against the coverage diagramed, but even better against Cover 0 if you can keep the blitz out. The initial rub can give Z the separation he needs to get open on his Dig route if they plan straight Man, while X's Post will usually defeat a DB maintaining outside leverage if they switch coverage.
Z pushes up and inside for five yards before he pushes hard straight downfield to +10 or so. There he cuts to the Post, looking to make eye contact against a free safety, before cutting horizontal at +15-16.
X gains width at the snap, then straightens out and takes it downfield to around +12. There he drives for the corner for two or three steps, then cuts back hard on a skinny course to the Post.
123 POST
This is a deceptively simple route package that works well against both man and zone coverage. It is the only package in which H runs his pattern behind the LOS to the Bunch side, which combined with inside releases by Y and Z can pop H free against inside-out coverage such as Cover 1 or Cover 4.
X reads the same Outside Vertical/Slant route on the fly that he runs in 103 Read (if coverage sticks tight, go deep; with a big cushion, cut to the Slant -- page 94). Z runs a Shallow Cross, while Y runs a Post after a quick nod to the Flag at about +8. H runs a fishhook similar to Z's route in 117 Slide (page 42). QB takes a 3-step drop while reading the flat defender. If he hangs or comes up to cover H, QB continues his progression from front to back -- Y's Post, Z's Cross, and finally X. If the flat defender closes down inside with Z, QB should hit H as quickly as possible. H should whip his head around to look for the ball as soon as his shoulders turn downfield in his fishhook.
102 QUICK SCREEN
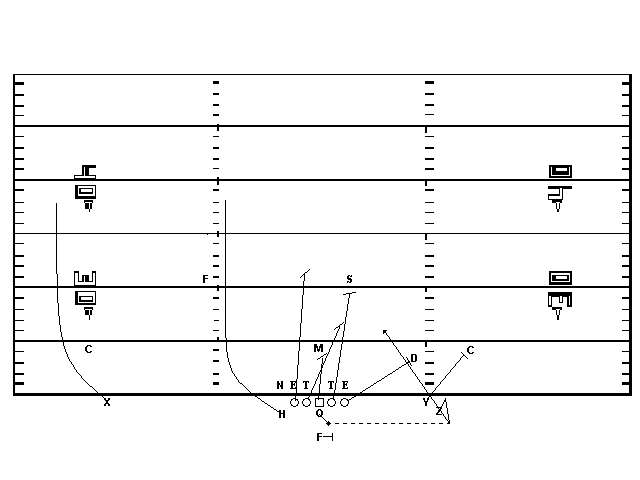
This gives us a good answer to an over-enthusiastic pass rush. X and H run Seam routes, trying to clear as much backside coverage with them as possible. The line (except for Bunch Tackle) releases immediately for the nearest LB; if someone else already has him, continue downfield for the next wrong-color jersey. Bunch Tackle attacks the defender over Y, while Y blocks the man over Z. Z takes an outside diagonal step with his inside foot, then pivots and drops back to face the QB. QB throws the ball at about 60% speed as soon as he has it under control -- this is a "half-step" drop, with QB opening up with his Bunch-side foot pointing right at Z, and gets the ball to him right now. Z gathers the ball in and cuts inside BT's block, then looks downfield for maximum daylight. FB steps playside, but isn't involved in the play. We have a companion fake-screen-and-Go play, where QB first fakes the screen and then drops back to pass, but we only use it after we've hit the screen at least twice.
39 STATUE
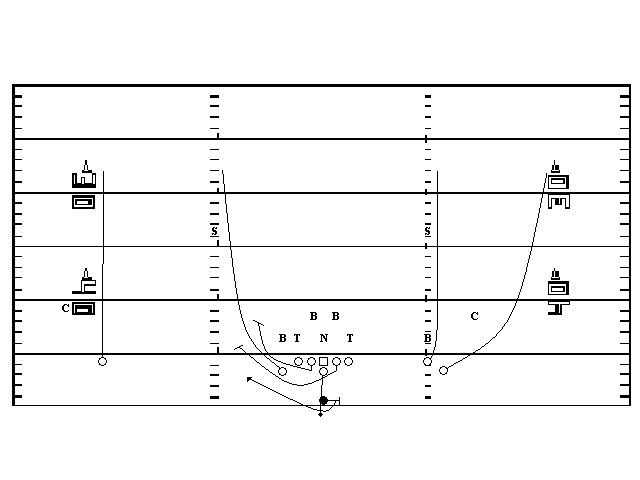
This play also takes advantage of over-enthusiastic pass drops by the underneath coverage combined with ears-back pass rushing -- very useful against Cover 2 Man in particular.
Guards pass-drop facing slightly toward Bunch, to encourage a rush to that side. After a full two second count, they pull hard to Spread -- Spread Guard looks for the first wrong-colored jersey past Spread Tackle, while Bunch Guard pulls very deep to allow FB to turn the corner, then leads him downfield.
FB sets exactly as he would to pass block, counts one second, then whips around to Spread side, takes the ball out of QB's hand (who is faking a pass), and follows BG around end. X, H, Y and Z try to drive their men as deep as possible. We find this works much better than breaking down and trying to block defenders -- which doesn't resemble anything else we do on offense. Running deep is "normal" behavior for Wild Bunch receivers, and we find DB's will take themselves right out of this play 90% of the time.
67 SPREAD GUARD SPECIAL (SGS)
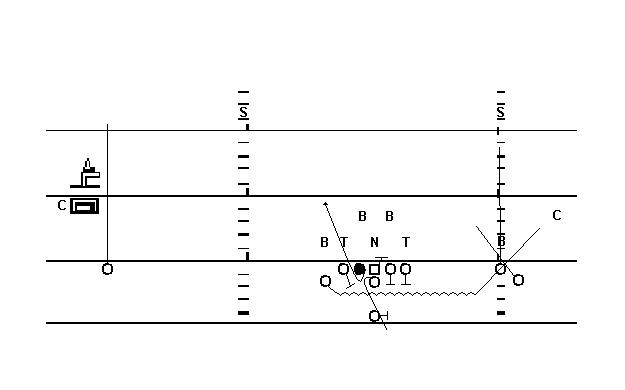
This is (obviously) Coach Bruce Eien's Left Guard Special. Like every other former offensive lineman who coaches, I only wish someone had installed this when I was playing! To paraphrase Coach Eien: Spread Tackle must protect Spread Guard. If anyone is head up or in a 3 shade, ST down blocks and stays on him. If the DT is anywhere on ST he must take away the DT's inside and invite him on an outside pass rush or make him come upfield. If he fights across pressure push him past SG toward flow. Center blocks Bunch side A gap unless there's a 1 shade DT over SG. C and ST must protect SG. Everyone else blocks for a Bunch pass.
SG turns around toward QB and takes the handoff. In doing so, he meets the rule requirements that he be a yard off the LOS and have turned 180 degrees away from it. He bends over like he is sick to his stomach and hides the ball. This is vital, as only the onside DT and LB know where the ball is. The LB sees the handoff but still reacts to the Bunch pass fake. QB then drops normally (although we have also had him fake a "slow" draw like 38). SG waits a full two seconds before he drop steps and heads straight downfield. This pause allows the backside End/LB to come upfield and avoids accidental tackles.
PASS PROTECTION
We prefer zone or area protection. Guards and Tackles set up as far off the LOS as the rules permit (helmets even with the Center's belt is a good rule of thumb). On the snap each lineman takes a short step to get square with the rusher in his area. If uncovered, he checks the near LB, then kicks back at a 45 degree angle for backside rushers. (Note: FG/BG etc. refer to Frontside/Backside Guard.)
100 (DROPBACK) PROTECTION:
BT: First rusher (line or LB) from frontside gap to head-up. Otherwise, check backside.
BG: Same.
C: Same.
FG: Block #1; if no one comes, drop deep to frontside and check for pursuit.
FT: Block #2 on line from inside gap, to on, to outside gap; if not, check LB.
200 (HALF-ROLL) PROTECTION:
BT: Hinge
BG: Hinge
C: Even: Hinge; Odd: Reach
FG: Reach
FT: Reach
In 100 or 200, FB takes two steps toward the frontside sideline while reading the outside rush. If #3 takes an inside charge, FB seals him inside and rides him past the QB. If he runs deep to contain, FB locks out and takes him deep. If #3 attacks FB hard and head on, FB chops the outside hip with his inside shoulder. If no one rushes, FB checks middle and backside, then releases.
When zoning a stunt, linemen must communicate. The diagram below shows the man over FT rushing inside. FT goes with him, keeping him on the LOS. FG sees his man disappear behind FT and calls out "Loop". FG shuffles toward FT, bumping hips with him and contacting the inside rusher with his near hand. Both FG and FT call "Switch". FG now has the inside rusher, while FT squares up to meet the outside loop charge.
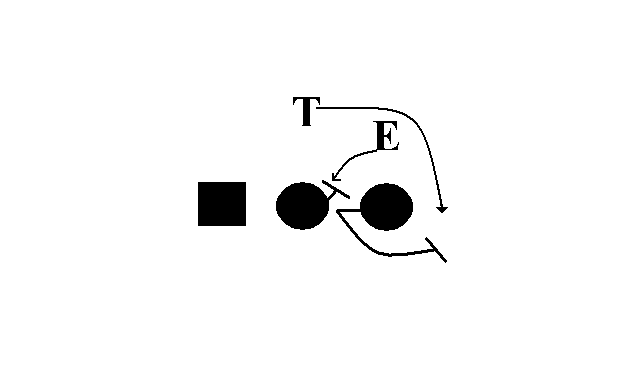
If there is an overarching philosophy to running the Wild Bunch, it is to throw it where they ain't, and to influence where they ain't through formation, motion, and deception. That said, this isn't a wild-eyed deep passing attack -- at least, that's not all it is. The ball-control pass is as central to the Wild Bunch as it is to the WCO, while retaining the simplicity and the built-in deep threat of the R&S.
Starting with the basic threat which Seam represents (and we will come back to Seam frequently to test the deep defenders), we complicate matters with Cross, and even further with Switch. Cross places short inside pass defenders in a bind, since we have removed the outside deep defenders from the equation after establishing Seam. Switch drives the Bunch-side cornerback and safety deep, after which we throw the Choice route to H. One slip on the part of the deep backs, meanwhile, and we score six.
Go reminds defenders that the Bunch is not the only threat to this offense, and practically constitutes a pass offense in itself -- there have been games where our offense has literally turned into "Go, Go, Go!" An excellent ball-control pass against any coverage, it is also a great blitz-beater, since our QB is conditioned to look for H breaking outside in a hurry against Cover 0. Slide also puts great pressure on the flat defender by creating R&S Trips and stretching the secondary in two dimensions, while Divide prevents over-rotation to Spread by defenses, especially Cover 2.
Mesh is in many ways the ultimate Bunch route. There are too many ways to beat man and zone coverages with Mesh, and that's before we start responding to coverage adjustments with different tags for our three Bunched receivers and X on the backside. Triangle is certainly a great Red Zone package, but is also a very versatile 3rd and medium-to-long route. Starting H's Fade from behind Z can give him that all-important extra step on a man defender at the snap, while both Y's Option and Z's Whip Read are excellent go-to routes against zone coverage. (When we run Trap with Bunch motion, we snap the ball when H passes behind Z, to convince the defense we're throwing Triangle.) If Mesh, Triangle and Switch get defenses creeping toward the Bunch side before the snap, we will come right back to attack the Spread side with Smash, Over, and especially Option Screen. For that matter, with our best and fastest receiver at X, we will test the backside defenders regularly from Mesh, Switch and Triangle, as well. "Spread them out and test them" is another way to state the Wild Bunch credo.
The most recent addition to the Wild Bunch has been Coverdale and Robinson's Short and Turn packages, to allow us to attack the under-coverage on the Spread and Bunch sides, respectively. As with all of their concepts, C&R have many ways to run Short and Turn -- I have chosen the methods which conformm best to the Wild Bunch formation and philosophy (KISS - Keep It Simple, Stupid!)
For anyone concerned that an offense with "only" 18 or so plays can't provide enough versatility to combat today's defenses, it should be obvious that, with a reactive passing offense, numbers can deceive. We adjust one or more routes in all of our route packages depending on coverage, giving three or four different "looks" from the same package. If you multiply coverage adjustments by route packages, then add running plays, you'll see that the Wild Bunch actually consists of about 45 plays -- respectable by any standard. This is why we run from one formation -- to give enough time in practice to perfect the adjustments called for in running "only" 18 plays.
The running game is no afterthought. We spread the defense as much to create holes for FB, H and Z as to open passing lanes for our QB. Glenn "Tiger" Ellison's original R&S offense consisted of four running series and only one passing series, since he calculated that running nine against six in the box - after forcing the defense to spread to cover his formation - was good odds by anyone's reckoning. The Fly Sweep series provides a mechanism for getting outside with speed while maintaining the same motion that we use to create the Bunch or R&S Trips, so the Sweep appears to be a pass play until the ball is snapped. The FB Dive creates a complementary inside threat, while the Bootleg reduces backside pursuit and brings the QB outside of containment, often with single coverage on the backside receiver. This is basically the same series Coach Manny Matsakis ran from his "Sting-and-Shoot" at Emporia State during the mid-90's with such devastating effect.
The rest of the ground game consists of FB plays between the tackles, and most can be run with or without motion - Bunch motion or Spread motion, in several cases, to prevent the defense from anticipating Go, Slide, Short or Draw when we motion to Spread. Once defenses start reacting to our ball-control passes to the flats (notably Go, Mesh, Turn and Switch) as well as the wide running threat of Sweep, we add a new dimension to our attack -- the more they spread out to cover the outside game, the more we pound it inside with Trap, Zone, Counter and Dive. Against Cover 0 and/or on 3rd and long, we can also execute much of our inside game (Zone, Trap and Counter) from Swap, with devastating results when we pick up the blitz.
I believe the asymmetry of the Wild Bunch has a lot to do with its effectiveness. The built-in horizontal stretch on the Spread side and the compressed-receiver threat on the Bunch side offer very different challenges to defenses, while the Fly Sweep series both ties those threats together and prevents early defensive reads before the snap.
To elaborate a bit about my philosophy with this offense, it is to hit outside first. We attack the flats with Mesh, Go and other route packages, and at the same time we will run Sweep and even some Bootleg early on. If the defense adjusts by reinforcing their flat coverage, we will start trying to hurt them further inside -- Short and Turn, Mesh with an emphasis on hitting Z's Whip Read, etc. We will also start to mix up Dive with our Sweep game. If the defense adjusts again to strengthen the hook area, we now have a clear shot up the middle with our complete FB inside running game -- Trap, Zone, Counter and Dive, as well as passes like Cross. If the defense doesn't adjust, we will continue to hit them further outside.
All this time, we are also probing their deep coverage, depending on how good a QB we have. We're playing safeties inside and out with Seam, Cross, Mesh and Switch, getting them to commit inside or out and then throwing the ball the other way. None of this is very hard on the QB's arm -- we create throws for him that are fairly short and usually not too far outside. We don't throw too many Out patterns, because that's asking a lot from a high school QB.
Of course, as a season goes on, we start playing teams that have scouted us fairly thoroughly, and we see defenses that are prepared for our attack in the flats. So, we start probing the other areas first, looking to keep the defense off-balance no matter what they do. By spreading out and sending people in motion, we are going to get a good fix on what the defense is doing fairly quickly -- there are only so many ways you can arrange 11 defenders.
Can you run the Wild Bunch with an inexperienced squad? Yes, I think you can. There are not many plays to learn, and if you can find a kid who can hit the Shoot patterns to the flat consistently, and at least get the ball 15 yards straight downfield with fair accuracy (as opposed to a 15 yard Out), you have yourself a Wild Bunch QB.
It would be possible to install a "Wild Bunch Lite" offense with fewer plays: 101 Cross, 113 Go, 124 Mesh, 126 Switch; 21/49 Sweep, 33/37 Dive, 35 Trap, 38 Draw; and either 321 Wheel or 333 Bootleg plus 335 Over. Four dropback passes, four runs and two play-action passes. That's not much bigger than a Double Wing repertoire, and I think you can do a lot more damage faster with the WB than the DW. The strategy is just the same as outlined above -- attack the outside first with Sweep and Mesh (H's Shoot pattern in particular) until they adjust, then Dive and Trap inside while throwing to different receivers in Mesh. Mesh is almost a complete passing offense in one play. If the safety starts widening to get over the top of Y's Smash route, come back with Switch and throw the ball right down the hash alley to Z. Meanwhile, make sure to run Trap with both kinds of motion AND with no motion -- keeping the defense off-balance with everything you do. Play action further clouds the picture for the defense.
Consider the Wild Bunch from the defensive point of view. When we line up at the LOS, the defense must be prepared for:
100 Seam, 101 Cross, 202 Smash, or Trap, Zone or Counter, without motion.
H starting in motion, followed by:
21 Sweep, 33 Dive, 321 Wheel or 333 Bootleg;
124 Mesh, 225 Triangle, 126 Switch, 129 Turn or 335 Over;
Trap (or, from Swap, Zone or Counter).
Z starting in motion, followed by:
49 Sweep, 37 Dive (we can easily install a 337 Bootleg) or 349 Dig;
112 Divide, 113 Go, 114 Out, 115 In, 117 Slide, 118 Short or 38 Draw;
Trap, Zone or Counter.
Neither when we come up to the LOS, nor after we send a receiver in motion, can the defense over-commit to stop a particular threat.
The Wild Bunch makes life particularly hard for certain defenders. Y's flexed split complicates defending the Sweep and Counter, and the OLB or Nickel back over him will be repeatedly humiliated if he can't simultaneously cover the flat. That defender is in no position to rush the passer, either. We will test his mettle early and often. If he doesn't follow our Y end out to his flexed position, we will throw dump passes to Y all day long, right over that defender's head.
Life is no better for the deep safety against the Wild Bunch. Run support is out of the question against this gonzo offense, where four deep receivers are waiting to embarrass him on every play. We have seen deep safeties line up further and further back on every down as they attempted to cover the deep routes, which only opens up the crossing and flat routes even more. We will pick on a Cover 2 safety who sits on his hash by throwing to the Smash cut outside him from Mesh; if he starts gaining width over the top of Y's Smash, we'll come back with Switch and burn him right down the hash alley with a shot to Z as soon as he clears underneath coverage. Safeties assigned a line gap to fill against us soon find they have other priorities -- like not getting beaten deep.
A quick word about Cover 4 (and/or "quarters") coverage. We love to see it, especially on a fast field where we can make our cuts quick and hard. We'll run patterns that threaten deep and bring people in underneath, like Mesh and Switch; we'll throw Cross all day long against Cover 4 teams that leave one man to cover the short middle; and we'll come back with Go, where H cuts his Shoot up and inside the flat defender who is desperate to gain width against our Spread side.
The zone blitz has also proven vulnerable to the Wild Bunch. We can run a pure R&S solution, calling Go against teams that try to zone blitz us. We will pre-determine a Cover 0 read, with a quick throw in the cards to H or (less often) Z. If we have a Bunch route called, QB can call out "Swap! Swap!" and run the identical play, but with Y staying in to block backside. There is even a "Max" call available to keep 8 in blocking (H motions to behind BT, then blocks the end rusher) while we run 2-man Bunch patterns (pp. 109 - 111). We have rarely felt the need to use Max, though -- we have found spreading and throwing tttoo be the best solution to blitz and pressure defenses. Nothing dampens enthusiasm for blitzing like lots of points on the board, we always say.
I believe the Wild Bunch shares with the Davis R&S the distinction as a great equalizer for teams with limited offensive ability. As June Jones has proved once again at Hawaii, (and Davis established at Portland State), this offense allows kids to play who could never hope to start in more conventional schemes. There is a place here for "Smurf"-type receivers, and big lanky pass-catching kids, and tight ends and halfbacks with hands, and fullbacks who live to block and run for the tough yards inside. The running quarterback, who might otherwise feature in a sprint-out or option attack, will appreciate the R&S route packages and the way the Bunch brings receivers closer to him for easier throws. The Elway-style mad bomber will enjoy throwing through rubs and the ease with which he can read and isolate defenders.
I would refer readers to two essential texts, the Coverdale and Robinson book mentioned on Page 6, and Al Black's Coaching Run and Shoot Football (Haworth, NJ: Harding Press, 1991), for the mechanics of the Bunch and R&S passing and running games. We are not particularly fussy about the technique of quarterback drop that we employ -- either Davis's system (3-5 steps on the throwing arm side, 4-6 steps on the other) or the more common practice of dividing passes into 3 steps, 5 quick steps, 5 big steps, 7 steps, etc. Our bias, though, is always toward simplicity, which brings us back to Mouse Davis's brilliantly original system whenever we find ourselves getting too complicated. Black's book does an excellent (and appropriately brief) job of describing the Davis method.
Final final thoughts:
1) Max protection: I hate it, but I use it. This scheme flies in the face of what I think offensive football is all about -- spreading it and throwing -- but obviously there are times you need to be able to handle a blitz package you haven't seen before, even if only until half-time. I feel the same way about Snug and, to a lesser extent, Swap. I can see the utility of reinforcing backside blocking when throwing Bunch route packages, but it still grates on me to do so for the R&S plays.
2) Line calls: We can call "Up", "Down", and "Pinch". Up has the whole line reaching playside, while Down does just the opposite. Pinch brings everyone in toward the POA, and is used to pick up inside blitzers. The "Down" call is particularly useful in half-roll (200) protection, when the normal reach/hinge rule may not provide the best protection against a gap front. The Line blocks backside gap, while FB takes the playside EOL rusher.
3) Any questions? My e-mail is seayee@state.gov. Please feel free to contact me with any questions -- and good luck Running Wild!
08/24/03